|
RenderLayers
MaxScript Release 0.63 Beta Source FOR MAX 3 (3/7/2000)
Copyright (c) 1999-2000 by Borislav Petrov, Bobo's Rendert**ls. |
SHORT DESCRIPTION
RenderLayers (RL) is a custom-made Matte/Shadow Layer
Manager.
It allows the setup and rendering of multiple object
layers with
different output destinations for later compositing.
In addition, it now supports Render Passes (Ambient/Diffuse/Specular/Shadows).
HOW DOES IT WORK?
RenderLayers lets you generate any number
of Layers, assign Object to these Layers and
setup individual Matte/Shadow material
properties to each object in the Layer.
Each Layer has its own output destination
and rendering options. After the setup,
you can render all Layers with a single
click. Matte/Shadow materials are generated
and assigned at rendertime based on the
Layer settings, and after that all original
materials are reassigned back to the objects,
so the scene does not change.
The concept and workflow have been developed
by Sebastian Frey and
Christian Haas (Filmakademie Germany).
FEATURES
Version 0.63 BETA (3/7/2000)
WHAT'S NEW IN
VERSION 0.63 ?
-
Render Passes as LOCAL settings!
- each layer can be rendered in passes or as full frame now.
-
New Background switch in the Layer
Rendering Options - NOTE that it is OFF by default. SInce you will probably
want only one (background) Layer to render the Background color/map, make
sure to activate the checkbox when needed.
-
Scene Snapshot option (UNDER DEVELOPMENT!)
- lets you save single scenes with Matte/Shadow materials assigned. It
will save a single scene for each Layer and each RenderPass. Unfortunately,
the Rendering Dialog settings will not be set correctly. Currently it is
necessary to set the output path and any global rendering settings manually.
Could be used to send frames for Network rendering.
-
All Snapshot files will be saved in a custom
directory - there is a new Path option available.
-
You can either save the Current Layer or All
Layers just like with Rendering.
-
FIXED A BUG which prevented the script from
working with Target Lights and RenderPasses. It was caused by a test for
the wrong Object Class when storing Lights information. Sorry for the trouble.
Version 0.60 BETA (3/2/2000)
WHAT'S NEW IN
VERSION 0.60 ?
-
Render Passes as global settings - each image
can be rendered either as a single normal (FULL) image, or as separate
images containing only Diffuse colors, Specular Highlights, Shadows and
Ambient color (the summary color of all light hitting the surface before
being reflected).
-
The RENDER SEPARATE PASSES checkbox will be
disabled by default. Its state is being saved though.
-
The Shadow Pass, Diffuse Pass and Specular
Pass will be enabled by default. Their state will be saved in the RL Helper.
-
The Ambient Pass will be disabled by default.
Its state will be saved.
-
All Render Passes settings will apply to ALL
layers (they are GLOBAL settings).
-
To render ANY scene with Passes without using
the multiple layers options provided by the utility, do the following:
-
Load the scene
-
Launch RenderLayers
-
Press [New] to create a single new Layer
-
Under "Layer Rendering Options", set the desired
Output Path
-
Under "Global Rendering Options", check "RENDER
SEPARATE PASSES".
-
Check the Passes you want to render.
-
Press [RENDER LAYER] to render the scene.
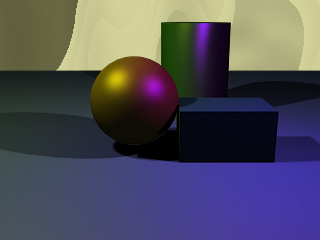
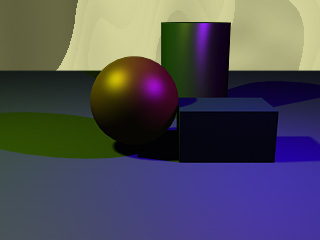
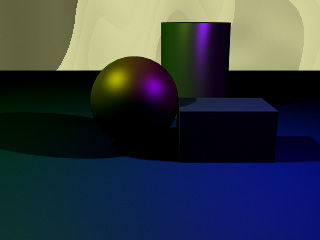
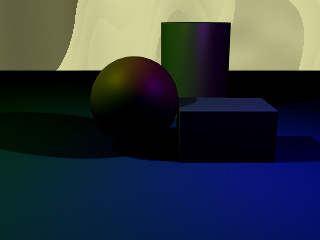
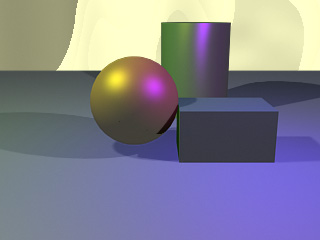
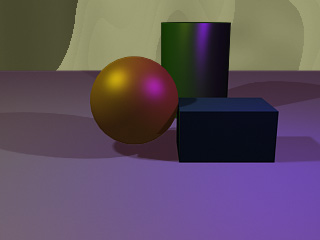
RENDER PASSES EXAMPLE

|

|
|
|
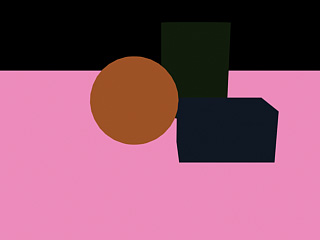
DIFFUSE PASS
|
SPECULAR PASS
|
|

|
|
|
|
SHADOW PASS
|
AMBIENT PASS
|
|
|
|
|
COMPOSITE PASSES
(Diffuse + Specular) x Shadows
|
NORMAL MAX RENDERING
|
|
|
|
|
COMPOSITE PASSES
(Diffuse+Specular)-(0.2xShadows)
|
COMPOSITE PASSES
(Diffuse+(0.2xSpecular)-(0.2xShadows)
|
|
|
|
|
COMPOSITE PASSES
((Diffuse+Specular)xShadows)+(0.2xAmbient)
|
COMPOSITE PASSES
((Diffuse+Specular)xShadows)x0.8)+(0.2xAmbient)
|
|
Version 0.50 BETA (10/2/99)
WHAT HAPPENED
TO VERSION 0.4x ?
-
Version 0.4x was an internal development with
minor changes which has not been made public because of plans to rewrite
the rendering code in an even newer version 0.5 to allow Progress Info
Window and Cancel functions. Please read on...
WHAT'S NEW IN VERSION
0.50 ?
-
Changed the Rendering code to allow more flexibility.
In older versions, the render command was executed once for each layer
and calculated all frames in a single turn. Version 0.50 calls the render
command once for each frame to allow Progress Info updates and Esc key
monitoring.
-
Implemented optional Progress Info floater
showing two progress bars (one for all layers, one for the current layer),
Layer name and frame settings, output path, current frame and time statistics.
-
The Progress Info can be turned off using
a new checkbox under Global Rendering Options (but who would turn it off
anyway?)
-
Whenever Esc key is pressed, all remaining
frames are skipped (but the script still has to run quickly through all
of them - sorry for the inconvenience)
-
Implemented an additional button under the
Matte/Shadow Layer List labeled "Get Selected". It allows the user to get
all selected scene objects into the Layer.
-
Changed tha labels on top of the check buttons/colors
to buttons to allow for tooltips. The buttons do not do anything yet.
-
Implemented some more error traps for cases
the user has deleted objects from the scene without updating the Layer
Lists. Still, there might be even more possible case the script could crash.
If you encounter any, please email me!
Version 0.32 BETA (7/2/99)
WHAT'S NEW IN
THIS UPDATE?
-
Implemented new "Hide Object" Layer switch
which hides objects on rendertime.
Version 0.31 BETA (6/29/99)
WHAT'S NEW IN
THIS UPDATE?
-
Implemented Support for all Optional Channels
in RLA and RPF files. Settings are Global and not Layer-Specific.
-
Implemented Two additional Utilities - [Generate
Object IDs] and [Select By Object ID]. The first generates unique Object
IDs for all geometry objects with ID = 0. The second selects scene objects
with specified ObjectID.
Version 0.21 BETA (6/26/99)
This Version fixes some problems with the
first release (which refused to work in most cases ;o).
It also adds some goodies.
WHAT'S NEW IN
THIS UPDATE?
-
Fixed the bug which prevented new scenes from
rendering with Layers. Sorry!
-
Implemented Error traps for deleted scene
objects in the Layer List. When Rendering, the missing objects will be
ignored and no error will be displayed. You will have to remove deleted
objects from the Layer list manually though.
-
Implemented a new button [Get Unselected]
which moves all unselected objects into the Layer leaving the selected
ones visible.
-
Enhanced the Listener output to print details
when rendering Layer or All. The total number of layers, the Frame settings,
the name of the currently rendered layer, the output path (if Saving is
active) are displayed.
Version 0.2 BETA (6/23/99)
This is the first official public version
of the utility after an early internal v0.1 Pre-Preview.
INSTALLING RenderLayers
-
RenderLayers is written as a MAX R3 MacroScript
and currently comes as two .MS files - the body code and the Layer UI code.
-
To Install, please open the script file called
RENDERLAYERS_xx.MS and Evaluate it.
-
Then go to the Rendering toolbar, Right-Click
> Customize > Rendering Tools Category.
-
Drag and Drop the RenderLayers button to the
toolbar.
-
You can start the utility by pressing the
button.
-
To close, use the Windows' [X] button.
-
You can restart the utility ANYTIME using
the toolbar button.
-
All changes during a session are written automatically
and immediately to a RenderLayers Helper object.
-
To keep the changes, you have to save the
MAX scene.
STARTING RL
-
When you start the utility, it will report
its status in the MAXScript Listener. There you can see which version of
RL you are running and which version has the RL Helper (if existing)
-
When used for the first time with a scene,
you will see a report about creating a new RL Helper.
THE RL HELPER
-
The RL Helper is a Text Shape named RenderLayers_Helper
which is frozen and hidden. All Layer Definitions are saved as AppData
in this object.
-
Deleting or renaming the RL Helper will affectively
disable all layer definitions and let the utility create a new one. THis
would let you keep multiple layer definitions in the same scene. A LayerSet
management utility to do this might be provided with future versions.
-
The RL Helper in each new version uses a slightly
different AppData format and is incompatible with the first Preview Version
0.1. If an old Helper from v.0.1 is found, it will be deleted and a new
one will be created automatically. If an older Helper higher than Version
0.1 is found, all compatible data will be used, the rest will be set to
default.
THE RL FLOATER
-
The User Interface has been implemented as
a single Floater containing (currently) 4 rollouts.
-
When you first start the utility, only 3 rollouts
will be shown: RenderLayers Setup, Global Rendering Options and Layer Rendering
Options.
-
When you create one or more Layers, a fourth
rollout called Current Layer Settings will appear. It will change its contents
depending on the Layer selected in the RenderLayers Setup / Drop-down list.
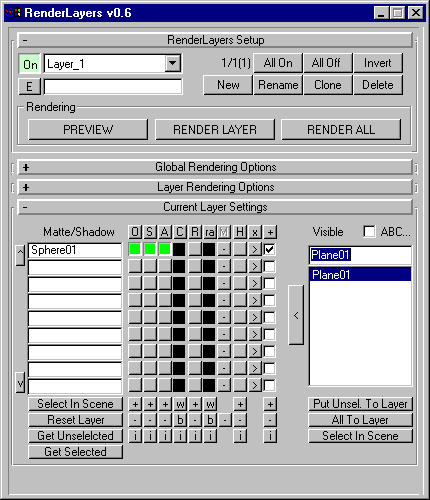
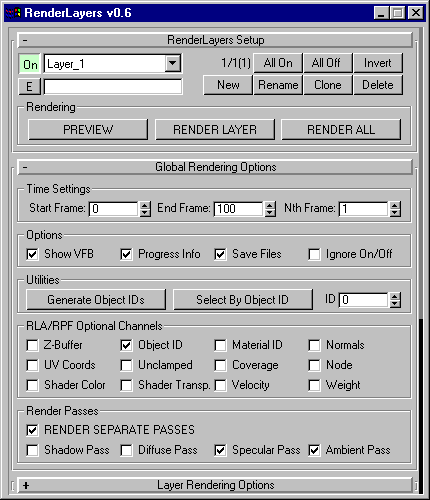
RENDERLAYERS SETUP
ROLLOUT
-
The RenderLayers Setup rollout provides you
with the UI to create and manage the Layers. It also contains the buttons
to start Rendering.
-
The [On] button in the top left corner is
the Activation check button - it is active by default when you create a
new Layer. You can depress it to disable the whole Layer from Rendering.
-
The Drop-down list contains the names of all
Layers currently in the scene.
-
The Edit field bellow it is the line where
you can enter new Layer names. It behaves as follows:
-
When the edit field is empty, a New Layer
is created with a default name "Layer_N" where N is the number of layers
in the scene.
-
When the edit field is NOT empty, the text
in the field is used as the new name for the Layer.
-
When the edit field is NOT empty and the [Rename]
button is being pressed, the current Layer gets the new name.
-
When the edit field is empty and [Rename]
button is being pressed, nothing happens.
-
You can press the [E] button to the ledt of
the edit field to copy the name of the Current Layer into the field for
editing. This will save you time retyping an existing name for Renaming.
-
Layer names can be of ANY length, but you
will probably want to keep them short to fit in the Drop-down list.
-
The text line to the right of the Drop-down
list shows the statistics. It contains 3 numbers in the form C/T(A) where
C is the Current Layer's number, T is the Total number of layers, and A
is the number of Active Layers.
-
The [All On] button makes all layers in the
scene Active - they will all be included in Rendering.
-
The [All Off] button deactivates all Layers.
Nothing will render.
-
The [Invert] button turns all deactivated
layers On and all active OFF.
-
The [New] button creates a new Layer with
default settings (no objects in Matte/Shadow list, all objects visible).
-
The [Rename] button changes the name of the
Current Layer to the one typed in the Edit text field.
-
The [Clone] button duplicates the Current
Layer and inserts the Clone right after the original. You can use this
function to create slightly different versions of Layers by Cloning and
tweaking only some settings instead of doing it all again.
-
The [Delete] button deletes the Current Layer.
This function has a Prompt (Yes/No) to prevent you from accidently deleting
a Layer.
RENDERING BUTTONS
-
Currently there are 3 buttons in the Rendering
group: PREVIEW, RENDER LAYER and RENDER ALL
-
PREVIEW renders only a single image of the
scene with the Current Layer settings at the current scene time. It does
NOT save to disk, but uses all other rendering options. Use this to test
the settings without generating images on the HDD. It doesn't respect the
Active/Inactive status of the Current Layer. Each PREVIEW opens a separate
VFB so you can compare the results. You have to close these VFBs manually.
-
RENDER LAYER lets you render the Current Layer
only using all Settings including Time Range and Disk Saving. It does NOT
respect the Active/Inactive status of the Current Layer.
-
RENDER ALL is the main Rendering function.
It respects ALL Global and Layer-specific settings, inclusing the Active/Inactive
state of all Layers.
GLOBAL RENDERING
OPTIONS ROLLOUT
-
The Global Rendering Options Rollout contains
the Time Range to render, and some General Options.
-
The Start Frame defaults to the Current Time
Segment start frame. It cannot be higher than the end frame of the Current
Time Segment. When Time Segment has changed, you will have to press the
RenderLayer button again to restart the utility and get the correct range
values.
-
The End Frame default to the Current Time
Segment end frame.
-
The Nth Frame defaults to 1 and can be ANY
value up to 1000.
-
There is still no code to prevent you from
setting the Start Frame higher than the End Frame. NOTE that there will
be no valid image rendering in such a case - just a back VFB.
-
The Show VFB checkbox lets you disable the
Virtual Frame Buffer display for the rendering session. Images will be
written to disk without being displayed. (A rendering progress bar will
be implemented in the future.) NOTE that the utility will update the Rollouts
to show you the Layer it currently renders.
-
The Save Files checkbox is active by default.
When unchecked, no files will be saved to disk.
-
The Ignore On/Off State lets you render ALL
Layers without having to change their Active state to ON.
-
All Global Options are saved to the RL Helper
object, but ONLY if there is at least one Layer defined in the scene.
-
The Global Options are valid for ALL Layers
in the scene.
LAYER RENDERING
OPTIONS
-
The Layer Rendering Options provides you with
settings which are specific for each individual Layer. These include the
Output Path/Name/Type, and the Rendering Options to control Qulaity vs.
Speed.
-
The [Get Path] button lets you pick an existing
path to save the rendered images to. You should use this button to assure
the paths you define are really present on the disk.
-
You may however type in the entire path manually.
If the Path does not exist, a Prompt will appear AT RENDERING TIME just
before the Layer gets rendered. Answering the Prompt with Yes will create
the missing path and save the images. Answering with No will skip this
particular Layer.
-
The Image File Name defaults to the Name of
the Layer when it was first created. (Renaming the Layer currently does
NOT chnage the File Name!) An additional Underscore character is inserted
to keep the name from the frame digits.
-
The drop-down list contains the supported
file Extensions. Currently, only TGA, RLA, RPF and PNG are supported because
of the good RGB/Alpha/Additional channel support they provide. The script
could be easily extended to support ANY File Type supported by MAX though.
-
The Rendering Options contain a "copy" of
some controls found in the MAX Renderer Dialog. They override any default
settings in that dialog.
-
Any other settings like Output Size or Anti-Aliasing
Filter type are taken from the MAX Renderer Dialog.
CURRENT LAYER SETTINGS
ROLLOUT
-
The Current Layer Settings rollout contains
the actual Layer controls.
-
The list to the left called "Matte/Shadow"
contains objects which are assigned a Matte Material at render time. The
list shows only 9 objects at a time, but can hold ANY number of objects.
-
Use the Up and Down arrow buttons to scroll
through the list.
-
A number of checkboxes/color swatches/checkbuttons
are located in the middle of the rollout. These provide the settings for
each individual object.
-
O stands for Opacity. When checked (Green),
it renders the object invisible with Alpha Channel opaque.
-
S stands for Shadows. When checked, the object
renders invisible but receives shadows from other objects in RGB.
-
Sa stands for ShadowAlpha. When checked, the
Alpha Channel will also contain the Shadow.
-
Sc stands for ShadowColor.
-
R stands for Reflections. When checked, the
Object will render invisible, but will show reflections of other objects.
-
Ra stands for ReflectionAmount. It is a color
swatch which is recalculated into Percentage.
-
Rm stands for Reflection Map. It is currently
NOT being used. Might be implemented in the future.
-
The X buttons [>] are used to remove a single
object from the Layer List.
-
The + chechbox lets you activate/deactivate
the object. It is active by default. When unchecked, any settings are kept
intact, while the object behaves as if it was in the Visible Object list.
-
The 3 rows of buttons at the bottom allow
you to turn the above checkboxes/colors on/off for ALL objects currently
in the Layer List with a single click. [+] activates all checkboxes. [-]
deactivates all checkboxes. [ i ] inverts them - active to inactive and
vice-versa. [W] sets the color swatch to White (active), [B] sets it to
Black (inactive).
-
The Visible Objects list contains all Geometry
Objects currently in the scene.
-
To move an Object to the Layer List, double-click
it in the Visible Objects list, or press the big [<] button to the left
of the Visible Objects list.
-
To Find the first object starting with a certains
character, tyoe in the character in the first (edit text) field of the
list. The Name (if any) will be displayed automatically in the Edit Field.
NOTE that this function is CASE-SENSITIVE!
-
To Move ALL objects from the Visible Objects
list to the Layer, press the [All To Layer] button bellow the list.
-
To Move ALL objects from the Layer back to
the Visible Objects list, press the [Reset Layer] button bellow the Matte/Shadow
list.
-
Press the [Select In Scene] button to select
all objects currently in a list.
-
The "Alphabetical" checkbox lets you sort
the names in the Visible Objects list. It also updates the list with any
newly created objects, so you can use it as an Update function.
-
IMPORTANT NOTE: Because of some MAXScript
limitations, certain characters are NOT allowed in an Object Name when
used with this script. RenderLayers will replace these characters with
an Underscore character "_". There might be characters not included in
the list of the utility though. Please let me know if you experience any
troubles with specific names.
DOWNLOAD RENDERLAYERS
Version 0.63 BETA Source