Developing a Softlight Scripted Plug-inMaxScript Release 1.02 Tutorial and Source for 3ds max 3 and 4 (03/05/2001)Code by Borislav Petrov, Bobo's Rendert**ls.Online Tutorial Text Last Edited on 03/05/2001, 5:30am CET Offline Tutorial Text and Sources Last Updated on 03/05/2001, 5:30am CET |
In the first step, we will create the base
code of the script - a single pre-created light
will be used to test the concept.
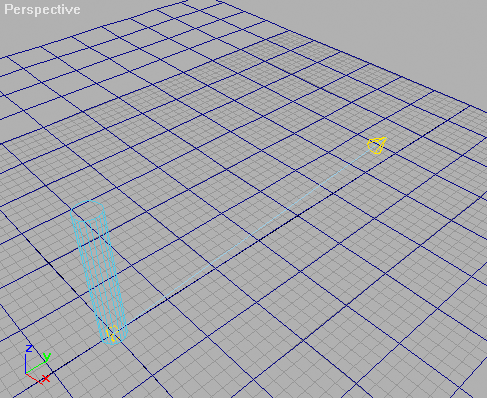
Load the sample scene Softlight_Base.max
(The scene was saved from MAX R3 and
can be used in R3 and 4)
There is a single spotlight called "Spot01", a cylinder and a plane. The Spotlight is set to use shadow maps:
Go to the MAXScript dropdown
list in the main manu and select New Script.
In the new window, type in the following
code:
We store the spotlight in a variable
called
s.
This way, we will be able to access
the spotlight parameters quickly.
Using the Dollar sign, we denote an
object path - the name after the $ is the name of the object
as it appears in the MAX scene:
s = $Spot01
We create a Helix shape with
outer radius 20, inner radius 0, no height and 5 turns.
It will be stored in the variable helix_path
for quick access.
helix_path = helix radius1:20 radius2:0 height:0 turns:5
We set the position of the helix to the position of the spotlight using the .pos property of both.
helix_path.pos = s.pos
We assign a Lookat transform
controller to the transformation track of the helix.
Similar to the Spotlight, we will want
the helix to be oriented to look at the target object.
helix_path.transform.controller = lookat()
| A User Asked:
why is the () placed after the line "helix_path.transform.controller = lookat() " |
Click here to read the answer... |
Now we have to specify the target object
to look at. We will create a copy of the spotlight target.
The reason we don't want to use the
original target object is that if we decide to delete the helix
later, this would also automatically
delete the target of the source spotlight and leave it targetless...
Since we assigned a Lookat controller
to the helix, the helix now has a .lookat property we can
assign to.
We use the copy method with
the target of the original spotlight to assign a looking direction.
helix_path.lookat = copy s.target
To be able to delete the helix later,
we have to assign a unique name to the object.
The uniquename method takes a string
and adds the necessary numbers to the end based
on the number of objects with the same
name in the current scene. We assign the result to the
.name property of the helix.
helix_path.name = uniquename "SoftLight_Temp"
Now we have to link the helix to the
spotlight so that we can move the light and have the helix
stay where expected. We assign the
spotlight to the .parent property of the helix which causes
the helix to become a child linked
to the light.
helix_path.parent = s
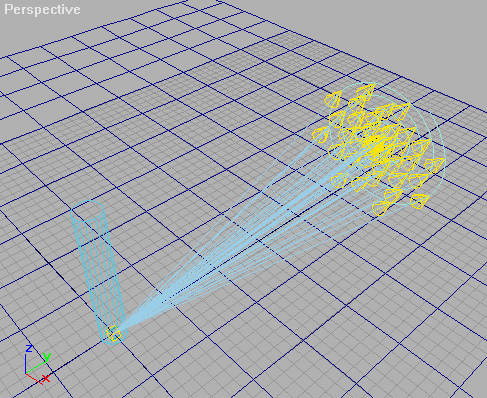
We will need alot of copies to get smooth
shadow appearance. We will take 42 copies
(don't ask why exactly 42 - if we knew
the answer, the world would be a different place ;o)
We store the number in a variable.
Later on, we will have an own value in the parameter block of the scripted
plug-in to assign through the rollout.
num_lights = 42
Now we can go on and create the copies
of the light.
We start a for loop which will
count from 1 to the number of lights (42) and repeat the code inside the
brackets:
for i = 1 to num_lights do
(
In a new variable called new_light, we store a copy of the original light.
new_light = copy s
We create a copy of the original target...
new_target = copy s.target
... then we set the new spot to use this new target.
new_light.target = new_target
Since we will have 42 lights, we should
use 1/42 of the original intensity in each copy.
We read the .multiplier property
of the original and assign the value divided by 42 to the .multiplier
of
the copy.
new_light.multiplier = s.multiplier / num_lights
Like with the helix, we assign a unique name to the copy so we can delete all copies easily when we need to.
new_light.name = uniquename "SoftLight_Temp"
We will have to make sure the copy has
the correct shadow mode to work around a glitch in MAX/MAXScript.
If you create a Spotlight with shadow
maps, then change the shadow mode to Raytraced and create copies
with MAXScript, the copies will report
as raytraced in the rendering progress dialog, but will report in the rollout
and will render as shadow-mapped.
We set the .raytracedShadows
property of the copy to the same value (true or false) as the original:
new_light.raytracedShadows = s.raytracedShadows
We will use the helix shape to place
the copies around the original in a sort of light disk.
To spread them correctly, we assign
a
Path controller to the position controller of the light copy and
set the path controller to use the
helix as the path spline!
new_light.pos.controller = path path:helix_path
We make sure the position controller
has no keys - we just delete them all. The reason is that the
Path controller always generates a
key at the first and last frame of the current segment when a
path is picked! We use the deleteKeys
method
on the keys of the percent track of the controller
in
the
position track of the light
copy with the option to affect all keys
deleteKeys new_light.pos.controller.percent.keys
#allkeys
| A User Asked:
why is the # sign in "deleteKeys new_light.pos.controller.percent.keys #allkeys" |
# denotes a Name
Class in maxscript.
This is a special value class used for all sort of switches. Basically, the Online Help tells you where and when to use these switches, and the #allkeys switch is a typical option of the deleteKeys function... You don't have to keep this in your head, even I look at the Online Help 100 times/day :o) |
To place each spotlight at a different
location along the path, we divide the number of the light
through the total number of lights,
multiply by 100.0 and assign the result to the percent track
of the path controller in the
position
track
of the light copy:
new_light.pos.controller.percent=(100.0*i/num_lights)
| A User Asked:
What does the * doing in the line "new_light.pos.controller.percent=(100.0*i/num_lights)" |
Click here to read the answer... |
We also have to make sure the copies
are turned on - if the original is currently off, all copies would be off,
too.
We set the .on property to true
new_light.on = true
)
The above code between the brackets
will repeat 42 times.
After it is ready, we will have to
turn off the original spotlight. We can set its .on property to
false
s.on = false
Now we can press Ctrl+E (or File/Evaluate
All in the Script Editor window)
The result will be lots of spotlights
in the scene:
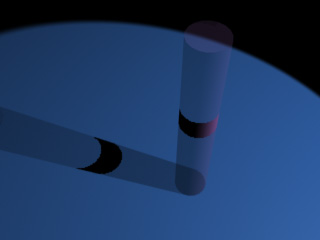
Rendering the scene will reveal a soft
shadow appearance as desired!
|
|
|
|
| SHADOW MAPS | 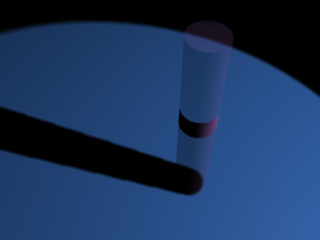 |
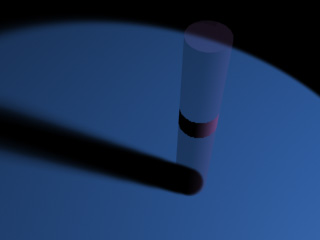 |
| RAYTRACED
SHADOWS |
 |
 |
Click here
to see the complete source of Phase One.
PHASE TWO - CONVERTING TO A CALLBACK SCRIPT
(SKILL LEVEL: INTERMEDIATE)
In the next step, we will put the code
we just entered into a single string variable and assign the string variable
to callback.
A callback script can be stored with the
.MAX scene (it "lives" in the scene) and can be called at specific events
using the internal
MAX notification system. For example,
it is possible to execute such scripts when a new file opens, the renderer
starts rendering etc.
We will use the #PreRender and #PostRender
events to generate our light copies on the fly and delete them after finishing
rendering.
To use the callbacks, we have to add all lines of the code to a string variable.
First of all, we delete any existing callbacks with our id (the #softLight ID is user-defined and denotes our current work)
callbacks.removescripts id:#softLight
Then we create a variable called txt
and add all lines of the script to it. Each line should end with a \n
(NEW
LINE) code and should be inside parenthesis.
Strings already using parenthesis will
require an additional escape symbol \"
txt = "s = $Spot01 \n"
txt += "helix_path = helix radius1:20
radius2:0 height:0 turns:5\n"
txt += "helix_path.pos = s.pos\n"
txt += "helix_path.transform.controller
= lookat() \n"
txt += "helix_path.lookat = copy s.target
\n"
NOTE the \" \" pair inside the " " string:
txt += "helix_path.name = uniquename
\"SoftLight_Temp\" \n"
txt += "helix_path.parent = s
\n"
txt += "num_lights = 42 \n"
txt += "for i = 1 to num_lights do
\n"
txt += "( \n"
txt += "new_light = copy s \n"
txt += "new_target = copy s.target
\n"
txt += "new_light.target = new_target
\n"
txt += "new_light.multiplier = s.multiplier
/ num_lights \n"
txt += "new_light.name = uniquename
\"SoftLight_Temp\" \n"
txt += "new_light.raytracedShadows
= s.raytracedShadows \n"
txt += "new_light.pos.controller =
path path:helix_path \n"
txt += "deleteKeys new_light.pos.controller.percent.keys
#allkeys \n"
txt += "new_light.pos.controller.percent=(100.0*i/num_lights)
\n"
txt += "new_light.on = true \n"
txt += ") \n"
txt += "s.on = false \n"
Now that we have the whole code inside
the string variable, we can assign the string to the callback:
The event will be #preRender,
the id is the same for all callbacks in our script and persistent:true
makes the script live with
the MAX scene and save/load with the
.MAX file.
callbacks.addScript #preRender txt id:#softLight persistent:true
We will need a second callback to delete
all light copies and the helix when the rendering finishes.
We redefine the text variable to contain
the following code:
Delete all objects whose name starts with SoftLight_Temp...
txt ="delete $SoftLight_Temp*\n"
...and trun the original light back on
txt += "$Spot01.on = true\n"
We assign this string to a #postRender callback with the same id and persistent state.
callbacks.addScript #postRender txt
id:#softLight persistent:true
Executing the above code will only list
the strings in the MAXScript Listener, but nothing else will happen until
you press the Render button.
You will notice that the number of lights
in the rendering progress window will increase as expected:
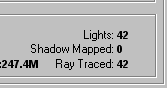
but the scene will be back to its original
state (one light only) when the rendering finishes!
Click here to see the complete source of Phase Two.
PHASE THREE - CONVERTING TO SCRIPTED PLUG-IN
(SKILL LEVEL: INTERMEDIATE)
Now that we have the main code working pretty reliably, we will create a plug-in script that will behave as a real C++ plug-in written with the SDK!
A scripted plug-in starts with plugin,
followed by the superclass of the plug-in (Light), the new class
name of the object (SoftLight) and the name
to appear on the button (used also
as default name of newly created objects) "SoftLight".
plugin Light SoftLight name:"SoftLight"
A plug-in (scripted or not) requires
a unique classID. It will be used by the system to recognize the plug-in
used when loading scenes.
It is a good
idea to use the number bellow so all SoftLight plug-ins in the world can
remain compatible!
To generate a new unique ID for other
plug-ins you might write, you can just type in the Listener genclassid()
classId:#(0x4e60b08c, 0x5ecd8b38)
The plug-in is not a new object but
extends
an
existing light class - in our case the TargetSpot.
We will get all properties typical
for that class PLUS our additions for soft shadows:
extends:TargetSpot
The category property defines the group
of lights in the Command panel the object's button will appear in.
Since the script was originally written
for and in the German Filmakademie, we could keep the name...
category:"FilmAkademie"
Now we open a bracket and start writing
the BODY of the plug-in.
It will contain a parameter
block (ParamBlock2) definition, a rollout and our already written callbacks.
(
The ParamBlock2 was introduced in MAX
R3 and is very useful for managing plug-in properties and sub-animation
tracks automatically.
It also provides linking to UI controls
and the red brackets on keys for values in the rollout of scripts etc.
without additional work by the developer.
Our parameters will be called softlight
and
will be linked to UI elements in the rollout called softlight_roll
parameters softlight rollout:softlight_roll
(
In the body of the parameter block,
we define some controls for our soft shadows.
The number of lights will be stored
in a track called numlights of type integer with default
of 42.
It will not be animateable
(will not generate keys when changed with Animate checked) and will
be controlled by the spinner in the
softlight_roll
rollout called also numlights.
numlights type:#integer default:42 animatable:false ui:numlights
The radius will control the outer
radius of the helix. It will be animatable over time!
We also set it to default of
20
and
make it of float type.
radius type:#float default:20 animatable:true ui:radius
We will also implement a switch to turn soft shadows on and off.
usesoft type:#boolean default:true animatable:false ui:usesoft
We will also need an "internal" variable
to remember the last ON state of the original light so
we can turn it back correctly when
rendering finishes.
onstate type:#boolean default:true animatable:false
Here we close the parameter block.
)
Then we start writing the rollout to
control the above parameters.
The rollout will be called softlight_roll
and
will show the name "SoftLight Parameters" in the Command panel.
The rollout will appear among the regular
rollouts of the light!
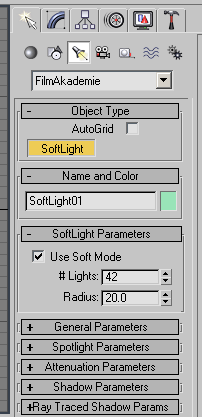
rollout softlight_roll "SoftLight Parameters"
(
A checkbox to be linked to the usesoft property we defined in the parameter block.
checkbox usesoft "Use Soft Mode"
We will also need the spinner with integer values for the number of lights (from 0 to 1000 lights allowed!)
spinner numlights "# Lights:" range:[3,1000,42] type:#integer
And a spinner (by default floating point value) for the radius (up to 100000 units!)
spinner radius "Radius:" range:[0,100000,20]
)
The plug-in will have just one handler
called whenever a new object of the SoftLight class is being created.
Inside the handler, we will place a
slightly modified version of our callback scripts, this time referencing
any SoftLights in the scene and using
their specific parameters!
(New code and changes to
the original callback scripts will be in red)
on create do
(
callbacks.removescripts id:#softLight
This new line will store all lights in the scene in a variable by accessing the global variable Lights and converting its content to array.
txt = "lights_array = Lights as array\n"
Then we will loop through all lights
in the array and check for their class. We will use only those of SoftLight
class.
The lights will be stored in the s
variable
which will contain a single light each time the loop repeats.
txt +="for s in lights_array where classof s == SoftLight do\n(\n"
Then we will see if the current softlight
has its Use Soft Shadows checkbox activated. If yes, we will execute the
code
and generate light copies. If not,
the light will remain untouched!
txt +="if s.usesoft then (\n"
txt +="helix_path = helix radius1:20 radius2:0 height:0 turns:5\n"
In the following line, we will assign
the whole controller of the radius variable from the parameter block to
the radius1 track of the helix.
INFO:
Whenever
you assing a controller of one object to a track of another, an INSTANCE
of the controller will be created!
Any changes
to one of the controllers will be reflected in the other and vice-versa.
This will ensure that any animation
applied to the radius spinner in our parameter block will be used by the
helix during rendering!
Since we cannot be sure the radius1
track has been animated, we place the code inside a try()catch() context.
INFO:
Most
animation tracks in MAX do not have a controller assigned until you create
keys in them. Attempting to assing an undefined controller
would lead
to an error and the script would fail. A try() context can catch any errors
inside the brackets and execute the code in the catch() context instead.
If there is a valid controller (animation
has been created), the controller will be assigned. If not,
just the static value of the track will be copied over.
txt +="try(helix_path.radius1.controller
= s.radius.controller)catch(helix_path.radius1 = s.radius)\n"
txt +="helix_path.pos = s.pos\n"
txt +="helix_path.transform.controller
= lookat()\n"
txt +="helix_path.lookat = copy s.target\n"
txt +="helix_path.name = uniquename
\"SoftLight_Temp\" \n"
txt +="helix_path.parent = s \n"
At this point, we have to set the number
of lights to the value set in the rollout. Since it is not animatable,
we just assign the static value directly...
txt +="num_lights = s.numlights\n"
txt +="for i = 1 to num_lights do \n("
txt +="new_light = copy s\n"
txt +="new_target = copy s.target\n"
txt +="new_light.target = new_target
\n"
In the case of extended plug-ins, the
original object is being accessed through the .delegate property
of the scripted plug-in.
Our Softlight object does not have
a .multiplier property, but the delegate object that lies
bellow it does.
txt +="new_light.target_spot.multiplier = s.delegate.multiplier / num_lights\n"
txt +="new_light.name = uniquename \"SoftLight_Temp\"
\n"
| 3ds max 4 | The .raytracedShadows
property
of the copies will have to be taken from the delegate instead...
Since we copied the SoftLight plug-in objects this time, we have to set it in the delegate of the copy, too... txt +="new_light.delegate.raytracedShadows
= s.delegate.raytracedShadows \n"
|
| MAX R3 &
3ds max 4 |
The .raytracedShadows
property
of the copies will have to be taken from the delegate instead...
In MAX R3, the .delegate object of an extended plug-in.such as our light (but also materials etc.) does not copy correctly. The extended plug-in still has a property called .target_spot that has the same function. To work around this problem, we will use the code bellow instead since it is compatible with both versions. Still the original version which works in 3ds max 4 only is cleaner. txt +="new_light.target_spot.raytracedShadows
= s.delegate.raytracedShadows \n"
|
txt +="new_light.pos.controller = path
path:helix_path\n"
txt +="deleteKeys new_light.pos.controller.percent.keys
#allkeys\n"
txt +="new_light.pos.controller.percent=(100.0*i/num_lights)\n)\n"
We will set the internal .onstate
variable to the current value of the on switch of the .delegate
light.
This way we will know later whether
the light was originally on or off.
txt +="s.onstate = s.delegate.on\n"
We have to set the on state of the delegate this time.
txt +="s.delegate.on = false\n))\n"
callbacks.addScript #preRender txt id:#softLight
persistent:true
txt ="delete $SoftLight_Temp*\n"
We will need an additional loop in the
#postRender callback to turn all original lights back to
their pre-rendering state. We go again
through all lights of class SoftLight and set their delegate's
state
to the value stored in our internal
onstate
property.
txt += "for s
in Lights where classof s == SoftLight do(\n"
txt += "if s.usesoft
then s.delegate.on = s.onstate)\n"
callbacks.addScript #postRender txt
id:#softLight persistent:true
)
)--end plug-in
The plug-in is now ready. Pressing Ctrl+E
will evaluate the code and will create a new plug-in called SoftLight
which will
appear as a new button in the Create>Lights>FilmAkademie
category.
To make the plug-in available each time you launch MAX, copy the source to the \Scripts\Startup directory or any Plugin path.
You can create the SoftLight just like a regular TargetSpot. You can look at the rollout in the Command Panel for the SoftLight controls:
In addition, in 3ds max 4, the radius parameter will be available in manipulate mode as a circle (through the default radius manipulator)!
