Next Please
(NP! for short) introduces a new approach to context-sensitive scene navigation and object selection
in 3ds Max.
In particular, it allows for fast and intuitive cycling through similar objects and sub-objects
with simple keyboard shortcuts.
It
has been tested in 3ds Max 9, 3ds Max 2008 and 3ds Max 2009+
and might be compatible with earlier versions.
INTRODUCTION
Next
Please! is an advanced but simple to use scene navigation tool.
Other than the typical list-based selection
methods like the Select By Name dialog, Selection Floater, Scene Explorer
and TrackView, NP! allows you to quickly cycle through sets of similar
objects with only two commands - Previous and Next - which can be assigned
to two keyboard shortcuts, for example the Left and Right Arrow keys.
In addition, a small floating dialog
provides controls over the type of objects to navigate through and options like sorting, hidden and frozen objects
filtering,
zooming at the selected object and so on. It also shows a drop-down list
with the current and all other objects in the set to cycle through
allowing the direct selection of any of them, or the selection of all of
them at once.
VIDEO
INTRODUCTION
Video 1: In the first Camtasia video,
you will get a first look at NP! and see how you can navigate objects by
Class, Category, Modifier and using the Automatic mode:
Video 2: The second Camtasia video
demonstrates the use of the Material modes to select objects using no
material, a specific Material Class and the same (shared) material:
Video 3: The third Camtasia video shows
the basic Object Name and Layer selection modes. Note that the Object Name
mode has been extended in v0.81 beyond the features shown in the video:
Video 4: The fourth Camtasia video
shows the abilities of NP! to select objects based on their location in a
hierarchy, including Helpers in a Spline IK Chain, children of the same
parent and children at the same hierarchy depth:
Video 5: The fifth Camtasia video shows
the Sub-Object selection abilities of NP! when used with Editable Mesh,
Editable Poly, Editable Spline, Mesh Select and Edit Mesh modifiers:
Video 6: The sixth
Camtasia video demonstrates the additional options of NP! including various
sorting modes, focusing on selected objects, switching of camera views and
creating undo records for the selection:
INSTALLATION
NP!
consists of one .MS source file defining all global functionality and the UI
elements like the floating dialog and the MacroScript ActionItems for
assigning to keyboard shortcuts or placing on toolbars and menus, as well as
four .BMP icon files which are optional and provide colorful icons for the
toolbar buttons.
The .MS file should
be copied into the \Scripts\Startup folder or any Plugin folder defined in
the external paths of 3ds Max.
The .BMP files should be copied into the \UI\Usericons folder of 3ds Max
either in the User's Local Settings or the 3ds Max installation folder,
depending on the 3ds Max installation setup.
After launching 3ds Max, the Category "Next
Please" should appear in the Customize User Interface dialog.
You can assign the MacroScripts to keyboard shortcuts and/or place them in
toolbars or menus according to your preferences.
The following shortcuts are recommended:
Left Arrow = Previous Object
Right Arrow = Next Object
SHIFT+Left Arrow = Previous
Mode
SHIFT+Right Arrow = Next Mode
Down Arrow = Next Please Dialog
SHIFT+Down Arrow = Toggle
Automatic Mode
USING NP!
NP!
provides a large number of manual cycling modes, but its default and special
override mode is
Automatic.
In this special mode, the tool will try to figure out the most probable
mode the user wants to employ based on the current selection. For example,
if the user has entered a supported sub-object mode in an Editable Mesh,
Editable Poly or Editable Spline and the Next or Previous commands are
invoked, NP! will automatically cycle through the sub-object selection. If a
helper object like a Point is selected, NP! will cycle through all other
Point Helpers in the scene and so on.
Note that Automatic is not a regular mode, but
an override. This means that you can TOGGLE the Automatic mode on and off to
switch to it or back to your last User Mode! For example, if the User Mode
is set to Layer and you toggle on Automatic mode, the Layer Mode will be
suppressed, but toggling Automatic mode off will go back to Layer mode
immediately!
To switch a user mode, you can either
open the Next Please Floating Dialog
and use the Menu>Mode to select one of the available options which are
sorted from the most specific to the least specific one.
Use the Next / Previous Mode keyboard
shortcuts (see above) or buttons to cycle to the desired mode - its name
will be shown in the prompt of 3ds Max.
To toggle the Automatic mode, you can
either
open the Next Please Floating Dialog
and use the Menu>Mode to toggle the Automatic option which is on top
of the menu.
use the Toggle Automatic Mode keyboard
shortcut (see above) to toggle directly between Automatic and the last
User Mode.
Note that switching to a User Mode will
toggle the Automatic mode off. Check Automatic again to exit the User Mode.
Below are the supported modes, from the
most general to the most specific one:
Scene Object
This least
specific mode cycles through all scene objects regardless of their class and
super-class (category).
If the Include Hidden Objects option is checked under Menu>Options,
this mode will visit every scene object found.
If the Sort Alphabetically option is checked under Menu>Options, the
cycling will be performed in alphabetical order.
If exactly one object is selected, the
cycling will start from it.
If more than one objects are selected,
the cycling will start from the first resp. last object in the
selection, depending on the cycling direction.
If no objects are selected, the
cycling will start from the first resp. last object depending on the
cycling direction.
Explicit Category
This mode cycles through
scene objects of the Category specified by the user.
The list of Categories includes
Geometry - any Geometry objects
including primitives like Box and Sphere, Editable Meshes, Editable
Poly, Patches and NURBS.
Shapes - any Shape objects
including Line, EditableSpline, Rectangle, Circle, Helix etc.
Lights - any Light objects
including Photometric, Omni, Spot, VRay and Brazil lights etc.
Cameras - any Camera objects
including Free, Target, VRay, Brazil etc. cameras.
Helpers - any Helper objects
incl. Dummy, Point, Tape etc.
SpaceWarps - any Space Warp
objects like Gravity, Wind, Deflectior etc.
Particle Systems - most
particle system including legacy Max particles, PFlow and Thinking
Particles.
Bones - any object with the
Bone property enabled.
thus matching the Hide By Category controls
in 3ds Max.
If no objects are selected, the
cycling will start with the first object in the scene found to match the
Category (if any).
If exactly one object is selected and
it matches the specified Category, the cycling will start from it. If it
does not match the Category, the cycling will still be performed as if
no object was selected.
If more than one objects are selected,
the cycling will start from the first resp, last object in the
selection, depending on the cycling direction, even if none of the
selected objects matches the Category. In that case, the cycling will be
performed as of no objects were previously selected.
Object Category
This mode cycles through scene objects of the same Category (like Geometry, Helpers, Lights, Cameras etc.)
based on the category of the selected object. For example, if a Point
helper is selected, activating the Next or Previous actions will cycle
through any other Helper objects including Dummies, Particle Flow operators,
Tape Helpers and so on.
If exactly one object is selected, the
cycling will start from it and will determine the Category to cycle
through. It is recommended to select exactly one object before using
NP! in this mode.
If more than one object is selected,
the cycling will start from the first resp, last object in the
selection, depending on the cycling direction. The SuperClass of that
object will determine the Category to cycle through.
If no objects are selected, an error
message will be shown in the 3ds Max prompt line and/or the NP!
feedback field and the status lamp in the NP! dialog will turn red.
Object Class
This even
more specific mode cycles through all scene objects of the same Class. For
example, if the scene contains 10 boxes, 20 spheres and 30 Dummies,
selecting one box and activating the Next or Previous actions will cycle
through only the 10 boxes. Selecting a sphere first will enable navigation
through only the spheres and so on.
If exactly one object is selected, the
cycling will start from it and will determine the Class to cycle
through.
If more than one object is selected,
the cycling will start from the first resp, last object in the
selection, depending on the cycling direction. The Class of that object
will determine the Class to cycle through.
If no objects are selected, an error
message will be shown in the 3ds Max prompt line and/or the NP!
feedback field and the status lamp in the NP! dialog will turn red.
Object Name
This mode cycles through
objects based on a common name. It removes the digits from the end of the
name and cycles through the objects that share the same base name, for
example Teapot01, Teapot42, Teapot101 and so on.
If exactly one object is selected, the
cycling will start from it.
If more than one object is selected,
the cycling will start from the first resp. last object in the
selection, depending on the cycling direction.
If no objects are selected, an error
will be displayed since there is no way to guess the name the user wants
to start with.
Layer
This mode cycles through
objects based on their layer. It finds the layer of the current object and
selects other objects on the same layer.
If exactly one object is selected, the
cycling will start from it and its layer will be used to collect the
list of objects to cycle through.
If more than one object is selected,
the cycling will start from the first resp. last object in the
selection, depending on the cycling direction.
If no objects are selected, an error
will be displayed since there is no way to guess the layer the user wants
to cycle through.
Material Class
This mode
cycles through all scene objects sharing the same top-level Material Class.
For example, if the scene contains 10 boxes and 5 of them have been assigned
5 different Standard Materials and the other 5 have been assigned a single
Matte Material, selecting a box with a Standard Material and activating the
Next/Previous commands will cycle through the five boxes with Standard
Materials assigned. Selecting a box with a Matte Material will cycle through
the 5 boxes with Matte Material assigned.
If exactly one object is selected, the
cycling will start from it and will determine the Material Class to
cycle by.
If more than one object is selected,
the cycling will start from the first object selected. The Class of that
object's material will determine the Material Class to cycle by.
If no objects are selected, an error
message will be shown in the 3ds Max prompt line and/or the NP!
feedback field and the status lamp in the NP! dialog will turn
red.
Shared Material
This mode
cycles through all scene objects sharing the same top-level Material. For
example, if the scene contains 10 boxes and 5 of them have been assigned 5
different Standard Materials and the other 5 have been assigned a single
Matte Material, selecting a box with a Standard Material and activating the
Next/Previous commands will NOT cycle at all because the box has a unique
material, but selecting a box with a Matte Material will cycle through the 5
boxes with the SAME Matte Material assigned.
If exactly one object is selected, the
cycling will start from it and will determine the Material instance to
cycle by.
If more than one object is selected,
the cycling will start from the first object selected. The material
assigned to that object will determine the Material instance to cycle
by.
If no objects are selected, an error
message will be shown in the 3ds Max prompt line and/or the NP!
feedback field and the status lamp in the NP! dialog will turn
red.
Base Object
Property (v0.81)
This mode
cycles through all scene objects using a Base Object with a given property.
A Base Object Property Name Pattern has to be entered and enabled via the
Names menu to search by ANY pattern using wild cards. The default pattern is
* which will select objects with ANY base object that has at least one
property.
Note that the base object will become
the current level in Stack View as you cycle, allowing for fast tweaks to
the base object's properties. The Modify Panel MUST be active when using this
mode.
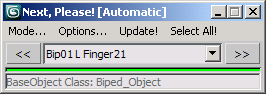
Base Object Class
This mode
cycles through all scene objects sharing the same Base Object Class. For
example, if the scene contains 10 Box primitives and five of them have a
MeshSelect modifier applied (which turns their modifier stack result to
Editable Mesh), selecting one box and activating the Next/Previous commands
will cycle through ALL 10 boxes because they share the same base object
class (Box).
Note that if the Modify Panel is open, the
base object will become the current level in Stack View as you cycle,
allowing you fast tweaks to the base object level of scene objects with many
modifiers.
Also note that the Modify Panel does NOT
have to be open for this mode to function.
If exactly one object is selected, the
cycling will start from it and its base object will determine the Base
Object Class to cycle by.
If more than one object is selected,
the cycling will start from the first object selected. The Base Object
Class of that object will determine the Base Object Class to cycle by.
If no objects are selected, an error
message will be shown in the 3ds Max prompt line and/or the NP!
feedback field and the status lamp in the NP! dialog will turn
red.
Base Object
Instance
This mode
cycles through all scene objects sharing the same Base Object as Instance.
For example, if you would create one Box primitive, clone it 5 times as Copy
and 5 more as Instance and select one of the Instanced boxes, activating the
Next/Previous commands will cycle only through the 6 instanced base objects
but will ignore the copies.
Note that if the Modify Panel is open, the
base object will become the current level in Stack View as you cycle,
allowing you fast tweaks to the base object level of scene objects with many
modifiers.
Also note that the Modify Panel does NOT
have to be open for this mode to function.
If exactly one object is selected, the
cycling will start from it and its base object will determine the Base
Object Instance to cycle by.
If more than one objects are selected,
the cycling will start from the first object selected. The Base Object
of that object will determine the Base Object Instance to cycle by.
If no object is selected, an error
message will be shown in the 3ds Max prompt line and/or the NP!
feedback field and the status lamp in the NP! dialog will turn
red.
If the base object of the first
selected object does not have any instances in the scene, the object
will remain selected and no cycling will occur, except for the Base
Object becoming active in the Modifier Stack if Modify Panel is open and
there are modifiers on the object.
Modifier Property
(v0.81)
This mode
cycles through all scene objects using a Modifier with a given property. A
Modifier Property Name Pattern has to be entered and enabled via the Names
menu to search by ANY pattern using wild cards. The default pattern is *
which will select objects with ANY modifier that has at least one property.
Note that the modifier in question will become
the current level in Stack View as you cycle, allowing for fast tweaks to
the modifier's properties. The Modify Panel MUST be active when using this
mode.
Modifier Name
(v0.81)
This mode
cycles through all scene objects using a Modifier with a given name. By
default, the name of the currently selected modifier will be used to find
any other objects using EXACTLY the same name. Optionally, a Custom Modifier
Name Pattern can be entered and enabled via the Names menu to search by ANY
pattern using wild cards.
Note that the modifier in question will become
the current level in Stack View as you cycle, allowing for fast tweaks to
the modifier's properties. The Modify Panel MUST be active when using this
mode.
Modifier Class
This mode
cycles through all scene objects sharing a Modifier of a specific Class. It
is determined by the current modifier selection in the Modify Panel. For
example, if you created 10 teapots and added a different Bend modifier to
five one of them, selecting one teapot with a Bend, highlighting the Bend
modifier on the stack and activating the Next/Previous commands will cycle
through the five objects that have a Bend modifier on their stack, ignoring
those without one.
Note that the
modifier in question will become the current level in Stack View as you
cycle, allowing you fast tweaks to the modifier's properties. The Modify
Panel MUST be active when using this mode.
If exactly one object is selected, the
cycling will start from it and the currently selected modifier (if any)
will determine the Modifier Class to cycle by.
If more than one object is selected,
an error message will be shown in the 3ds Max prompt line and/or the
NP! feedback field and the status lamp in the NP! dialog will
turn red. The message will instruct you to select a modifier on a single
object.
If no objects are selected, an error
message will be shown in the 3ds Max prompt line and/or the NP!
feedback field and the status lamp in the NP! dialog will turn
red.
Modifier Instance
This mode
cycles through all scene objects sharing a Modifier Instance. It is
determined by the current modifier selection in the Modify Panel. For
example, if you created 10 teapots and added an instance of the same Bend
modifier to five one of them and one unique Bend to each one of the other
five, selecting a teapot with an instanced Bend, highlighting the Bend
modifier on the stack and activating the Next/Previous commands will cycle
through the five objects that have the instanced Bend modifier on their
stack, ignoring those with unique ones.
Note that the modifier in question will become
the current level in Stack View as you cycle, allowing you fast tweaks to
the modifier's properties. The Modify Panel MUST be active when using this
mode.
If exactly one object is selected, the
cycling will start from it and the currently selected modifier (if any)
will determine the Modifier Instance (if any) to cycle by.
If more than one object is selected,
an error message will be shown in the 3ds Max prompt line and/or the
NP! feedback field and the status lamp in the NP! dialog will
turn red. The message will instruct you to select a modifier on a single
object.
If no objects are selected, an error
message will be shown in the 3ds Max prompt line and/or the NP!
feedback field and the status lamp in the NP! dialog will turn
red.
If the selected modifier is not
instanced in the scene, the object and modifier will remain selected and
no cycling will occur.
Hierarchy Dpeth
This mode
cycles through scene objects sharing the same hierarchy tree and the same
tree depth. This can be useful when selecting objects that have the same
relationship to a common hierarchy root, for example symmetrical parts of a
skeleton like the fingers on the two hands. Since the fingers have the same
number of ancestors up the chain, it makes it possible to cycle through the
left and then the right fingers in this mode, as well as any other objects
with the same number of ancestors.
If exactly one object is selected, the
cycling will start from it. The chain of parents up the tree will be
followed, then once the root is reached, all its children will be
collected and those with the same tree depth will be cycled through.
If more than one object is selected,
the cycling will start with the first selected object and its parent
will determine the siblings to cycle through.
If no objects are selected, or the
selected object does not have a parent, an error message will be shown
in the 3ds Max prompt line and/or the NP! feedback field and the
status lamp in the NP! dialog will turn red.
Siblings
This mode
cycles through all scene objects sharing the same parent. This is very
useful when working on multiple objects linked to the same parent but
otherwise unconnected. For example, create a Biped, set the Figure Structure
to Hands with 5 fingers. Select the Hand and press PgDn to select its
children (the fingers). Activating Next/Previous will cycle through the
finders of the hand because they share the same hand parent object.
If exactly one object is selected, the
cycling will start from it and its parent will determine the siblings to
cycle through.
If more than one object is selected,
the cycling will start with the first selected object and its parent
will determine the siblings to cycle through.
If no objects are selected, or the
selected object does not have a parent, an error message will be shown
in the 3ds Max prompt line and/or the NP! feedback field and the
status lamp in the NP! dialog will turn red.
Spline IK Helpers
This mode
was in fact the main reason for the initial development of NP! It
cycles through all Spline IK Helpers sharing the same Spline IK Control
modifier. This is very useful when tweaking a spline using the Spline IK
Helpers to position its vertices. Selecting one helper allows you to quickly
move to the Next/Previous helper in the chain without having to select each
one manually.
If exactly one helper is selected and
it is dependent on a Spline IK Control, the cycling will start from it
and its Spline IK Control will determine the other Spline IK helpers to
cycle through.
If more than one object is selected,
the cycling will start with the first selected object and its Spline IK
Control modifier (if any) will determine the other helpers to cycle
through.
If no objects are selected, or the
selected object does not have a Spline IK Control Modifier referencing
it, an error message will be shown in the 3ds Max prompt line and/or the
NP! feedback field and the status lamp in the NP! dialog
will turn red.
Sub-Object
This mode
depends on the current Sub-Object mode and selection and is not fully
implemented for all possible cases.
Currently, it supports the following objects, modifiers and SO levels:
EditableSpline
Vertex Selection - cycles
through the vertices of the current Spline in the Shape. If the Shape
contains contains multiple Splines, the cycling remains in the Spline
unless you select a vertex in another Spline manually.
Segment Selection - cycles
through the segments of the current Spline in the Shape. If the Shape
contains contains multiple Splines, the cycling remains in the Spline
unless you select a segment in another Spline manually.
Spline Selection - cycles
through the Splines in the Shape (if more than one). If the Shape
contains contains only one Spline, no cycling will occur.
EditableMesh
Vertex Selection - cycles
through the vertices of the base object level Editable Mesh, starting
with the currently selected one. If more than one is selected, the
cycling begins with the first or last selected vertex depending on the
cycling direction.
Edge Selection - cycles through
the edges of the base object level Editable Mesh, starting with the
currently selected one. If more than one is selected, the cycling begins
with the first or last selected edge depending on the cycling direction.
Face Selection - cycles through
the faces of the base object level Editable Mesh, starting with the
currently selected one. If more than one is selected, the cycling begins
with the first or last selected face depending on the cycling direction.
Polygon Selection - cycles
through the polygons (face groups with hidden edges between them) of the
base object level Editable Mesh, starting with the currently selected
one. If more than one is selected, the cycling begins with the first or
last selected face depending on the cycling direction. NOTE that due to
the way the polygons are calculated, some polygons might get skipped.
Use EditablePoly Polygons instead if you need full cycling.
Element Selection -
cycles through the elements (connected groups of polygons) of the base
object level Editable Mesh, starting with the currently selected one.
EditMesh/MeshSelect Modifiers
Vertex Selection - cycles
through the vertices of the modifier, starting with the currently
selected one. If more than one is selected, the cycling begins with the
first or last selected vertex depending on the cycling direction.
Edge Selection - cycles through
the edges of the modifier, starting with the currently selected one. If
more than one is selected, the cycling begins with the first or last
selected edge depending on the cycling direction.
Face/Polygon/Element Selection
- all three modes cycle through the faces of the modifier, starting with
the currently selected one. If more than one is selected, the cycling
begins with the first or last selected face depending on the cycling
direction.
EditablePoly
Vertex Selection - cycles
through the vertices of the base object level Editable Poly, starting
with the currently selected one. If more than one is selected, the
cycling begins with the first or last selected vertex depending on the
cycling direction.
Edge Selection - cycles through
the edges of the base object level Editable Poly, starting with the
currently selected one. If more than one is selected, the cycling begins
with the first or last selected edge depending on the cycling direction.
Border Selection
- currently not supported.
Polygon Selection - cycles
through the polygons of the base object level Editable Poly, starting
with the currently selected one. If more than one is selected, the
cycling begins with the first or last selected face depending on the
cycling direction.
Element Selection -
cycles through the elements (connected groups of polygons) of the base
object level Editable Poly, starting with the currently selected one.
EditPoly Modifier
This modifier is not supported yet!
Automatic
This
override mode combines most of the above methods in a smart navigation system which
evaluates the current selection and tries to figure out the most probable
command, starting with the most specific modes. For example, if a Helper is
selected and it is references by a Spline IK Control modifier, the Spline IK
mode will be preferred to the Point BaseObject Class mode due to its higher
priority, although both are
applicable. If an object is selected and the Modify panel is open and the
base object is highlighted, the Automatic mode will use the Base Object
Class mode. If the command panel is switched away from the Modify mode, the
Automatic mode would revert back to Object Class mode and so on.
SELECTION
DROP-DOWN LIST
NP!
provides a drop-down list in the floating dialog showing the current and all
selection candidates determined by the previous Previous/Next operation. The
list can be used to select directly ANY of the objects instead of cycling
through the list. The order of the objects on the list will respect any
sorting options like Alphabetical Sort etc.
UPDATE! OPTION
To collect
all selection candidates without actually cycling through the list, you can
press the Update! item in the floating dialog's menu. This will
perform the same calculations as using the Previous/Next operations without
advancing the selection, and as a side effect will also populate the
Selection Drop-Down List (see above)
SELECT ALL! OPTION
To select
all selection candidates on the list, you can press the Select All!
item in the floating dialog's menu.
NAMES (v0.81)
New in v0.81
is the Names menu which provides control over the pattern matching in
several modes.
All these options are currently NOT sticky!
Use Automatic Object Name Pattern
- when checked, the Object Name mode will build the name pattern
automatically from the base object name of the current selection as in
v0.8.
Use Custom Object Name Pattern
- when checked, a custom pattern entered by the user will be used. The
pattern can be edited in the text field at the bottom of the NP! dialog
as described below.
Use Automatic Modifier Name Pattern
- when checked, the Current Modifier's Name will be used to find
other objects using EXACTLY the same name.
Use Custom Modifier Name Pattern
- when checked, a custom pattern entered by the user will be used.
The pattern can be edited in the text field at the bottom of the NP!
dialog as described below.
Case-Sensitive Pattern - when
checked, the Object and Modifier Name pattern matching will use
Case-Sensitive comparison. When unchecked, the pattern matching will
ignore the case of the names. This does NOT apply to Base Object and
Modifier Property search!
Edit Custom Object Name Pattern...
- select this option to start editing the Custom Pattern to use in
Object Name mode. Press ENTER to finish the editing - the Mode will be
switched to Object Name and the Names pattern matching will be switched
to use the custom pattern. Note that you have to enter any wild cards
manually, no additional * will be added to the pattern when searching.
If you delete all text, * will be assumed automatically.
Edit Custom Modifier Name
Pattern... - select this option to start editing the Custom Pattern
to use in Modifier Name mode. Press ENTER to finish the editing - the
Mode will be switched to Modifier Name and the Names pattern matching
will be switched to use the custom pattern. Note that you have to enter
any wild cards manually, no additional * will be added to the pattern
when searching. If you delete all text, * will be assumed automatically.
Edit Modifier Property Name
Pattern... - select this option to start editing the Custom Pattern
to use in Modifier Property mode. Press ENTER to finish the editing -
the Mode will be switched to Modifier Property. Note that you have to
enter any wild cards manually, no additional * will be added to the
pattern when searching. If you delete all text, * will be assumed
automatically.
Edit Base Object Property Name
Pattern... - select this option to start editing the Custom Pattern
to use in Base Object Property mode. Press ENTER to finish the editing -
the Mode will be switched to Base Object Property. Note that you have to
enter any wild cards manually, no additional * will be added to the
pattern when searching. If you delete all text, * will be assumed
automatically.
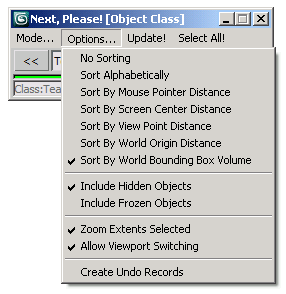
OPTIONS
NP!
provides several options accessible only through the floating dialog's
menu bar to enhance the selection process - Sorting, Filtering and Focus
controls. All these options are sticky
between sessions thanks to an .INI file.
Sorting
No Sorting - when checked, the
selection candidates will be cycled according to their order in the
scene database, which is usually their creation order.
Sort Alphabetically - when
checked, the selection candidates will be sorted
alphabetically first.
Sort By Mouse Pointer Distance
- the selection candidates will be sorted based on their distance to the
mouse pointer in screen space. The Next command will select objects
farther and farther from the mouse pointer, the Previous command will
select objects closer and closer. Changing the mouse pointer will update
the next selection command's context dynamically.
Sort By Screen Center Distance
- the selection candidates will be sorted based on their distance to the
center of the viewport. The Next command will select objects farther and
farther from the view center, the Previous command will select objects
closer and closer.
Sort By View Point Distance -
the selection candidates will be sorted based on their distance in 3D
world space from the viewer's position. Next command will select objects
farther and farther from the view point, the Previous command will
select objects closer and closer.
Sort By World Origin Distance -
the selection candidates will be sorted based on their distance in 3D
world space from the world's origin. Next command will select objects
farther and farther from the origin, the Previous command will select
objects closer and closer.
Sort By World Bounding Box Size
- the selection candidates will be sorted based on length of their
world-oriented bounding box diagonal which is an approximation of the
object's size. The Next command will cycle in descending order from the
larger to the smaller objects, the Previous command will move in
ascending order. NOTE that this sorting mode is about an order of
magnitude slower than most other sorting modes and should not be used on
large scenes.
Filtering
Include Hidden Objects - when
checked, hidden objects will be considered and selected. Such objects
will remain invisible in the viewports, but their modifier stack will be
available for editing.
Include Frozen Objects - when
checked, frozen objects will be considered and selected. 3ds Max does
not allow the selecting of frozen objects with the mouse, but MAXScript
and NP! in particular can ignore this.
Selection Focus
Zoom Extents Selected - when
checked and if the viewport is not a camera view, the current viewport
will be zoomed at the selected object. If the viewport is a camera view
and Allow Viewport Switching is also checked, the view will first be
switched to Perspective mode, then it will be zoomed at the selected
object.
Allow Viewport Switching - when
checked and if the selected object is a camera, the current viewport
will be set to that camera, thus allowing the cycling of cameras in a
viewport.
Undo
Create Undo Records - when
checked, the Next Please commands will create Undo records. When
unchecked, no undo records will be created for the selection operations.