Q:
I'm using 3d-studio dos version 4.
I've have made my own textures (*.jpg) and put them in the material editor.
When I put the material for example to a box the scale factor isn't right.
If I change the tiling and assign the mapping to the object, it will not
work. If I use the materials of 3d-studio, the tiling in the 3d-editor is
functioning good.
How can I solve this problem?
A:
The incorrect result you get might be caused by one of these:
You have applied mapping coordinates to the first box, and copied/scaled it to get the second - the mapping would scale with it...
You have activated the "Face Map" in the Material Editor. This means that the texture will fit the object size and any mapping coordinates assigned in the 3D Editor will be ignored.
You have applied different mapping coordinates in 3D Editor that fit the size of both objects. (Surface/Mapping/Adjust.../Region Fit)
This would happen when using Box mapping. (but this is not Your case)
There are two ways to achieve what you described:
1. Tile Settings in the 3D Editor:
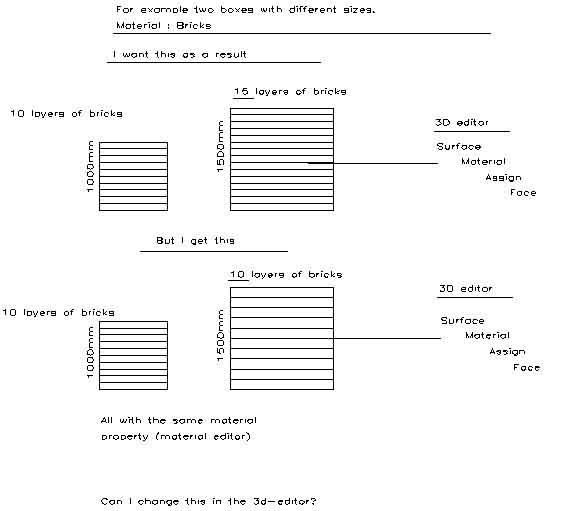
First let's create the Brick Material - the texture consists of 2 brick layers and is1 brick wide. (see background image in Top View on Screenshot 1.)
Press F5 to go to the Material Editor.
Put the brick texture to the Texture 1 Slot (100%), and drag&drop to the Bump Slot (15%).
Press C to make the material Current, name it.
Go back to the 3D Editor (press F3)
Turn Snap ON (press S)
Go to Create/Box, hold Ctrl to get a cube, create a box of 1000 units
Create a second box of 1500 units.
Assign the material to both boxes.
Go to Front View, use Surface/Mapping/Adjust.../Region Fit to set the mapping icon to the size of the first box.
Apply these mapping coordinates to BOTH BOXES! A single brick on the bigger box will have the same absolute size, but you will have more layers because of the size difference.
If you render now, you will have 2 layers on the first box and 3 layers on the second. (in our case, but it depends on the texture you use!)
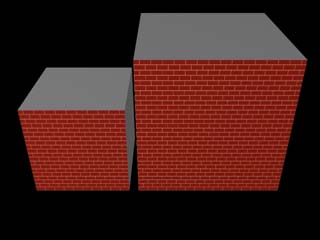
Let's set the Tiling now: Surface/Mapping/Adjust.../Tile and set both X and Y to 5 ->2x5 is 10 layers and 3x5 is 15 layers now! (See Rendering 1 in Screenshot 1 bellow:)

Screenshot 1/Rendering 1
2. The second way is using the Mapping Parameters in the Material Editor. (Release 3&4 only)
This method is used when you have set the mapping coordinates to many objects with the same material, and have to change the global scale of the texture without changing the Tiling in 3D Editor for every single object. It is also the only way to control Tiling when using Face Mapping or Box mapping.
Let's say we want to have not 10 and 15 layers on our boxes, but 20 and 30 respectively. You could set the tiling for the mapping coordinates to 10 instead of 5, but this is easy only when the objects are few and are not moved/rotated/scaled around... Here is the easier way:
Press F5 to go to Material Editor.
Drag&Drop a copy of the brick material to the second slot.
Click on the S button right to the texture. A dialog box will appear (see Screenshot 2 bellow)

Screenshot 2
Enter 0.5 for U Scale and V Scale. This will make the texture appear 1/2 of its original size.
Press OK, copy the texture to the Bump Map and then press T to put the new material copy to the scene.
If you render now, you will have 20 and 30 layers on the boxes:
Rendering 2
Btw, the See Tiling button in the Material Editor doesn't change any Tiling settings for the Material, it just DISPLAYS the texture with different tilings (1x1, 2x2, 3x3 and 4x4) for you to PREVIEW it!
Here is the .ZIP archive with the scene and the brick texture.