Q:
Hello!
I wonder if u could do a tutorial on skid marks after a car that spins
away in 3dmax ?
A:
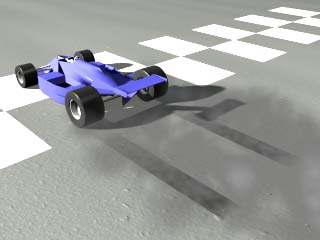
The following Tutorial is about skid marks of a starting racecar. It uses only standard and freeware plug-ins. It was made using Particle Combustion and Particles+ by Peter Watje, but you could use the standard MAX particles instead. Particle Combustion is the only plug-in that is really required.
|
Since the dawn of time
I've rolled across the Earth
Spinning in the dust
Long before your birth
Eatin' tar and gasoline
Every light I see is green
Open pipes' my machine's
Triple plated chrome
Spirit of the wheel
Manowar, "Wheels Of Fire"
|
 You can download the MAX scene to play with.
For the car, I decided to go with a free Indy car model found on the World Creating Toolkit CD-ROM of 3DS Release 3 & 4. You can use any existing car model, or create your own.
Import or create the car model. Make sure all parts are linked together so you can move the whole model around.
Create a large QuadPatch for the ground, move it slightly bellow the Constr. plane.
Create a Dummy helper, center to the rear left wheel and link to the car.
Create a rectangular Shape for the skid marks.
Align the end of it to the rear left wheel.
Apply an EditMesh modifier to the shape.
Right-click the rectangle, and turn Shadow-casting OFF.
Select the front vertices of the shape, and add a Linked Xform modifier to the selection.
Move the car until the rear wheel resides at the end of the trail rectangle.
Select the Dummy as the control object.
If you move/animate the car now, the rectangle will be stretched.
Apply another EditMesh modifier, turn Sub-Object off.
Apply a planar UVW Map modifier to the rectangle.
Now you can move the car to the position where the skid marks should end, and press the "Fit" button of the UVW modifier - the map gizmo will be scalled to the current lenght of the skid mark.
Now you can copy the rectangle for the right rear wheel.
Open the Material Editor. Create a material for the ground.
I used the ASPHALT.JPG bitmap as Bump map, and a stretched Noise Diffuse map to give some dirt to the road.
Create a material for the skid marks.
Put a greyscale Noise procedural map into the Diffuse channel.
Put a greyscale Gradient map into the Opacity map channel with following parameters:
In the Coordinates pannel of the Gradient map, turn "Tile" for both U and V off.
Because Tile is off, the Gradient will show the Noise map just once where the UVW Map gizmo shows. The rest of the rectangle will be totally transparent (invisible).
Create a Particles+ system and align to the rear left tire. Rotate around Z at about 20 degrees to point slightly up.
Set following Parameters:
Count:80
Render: Tetrahedron
Emitter shape: Rectabgular
Speed: 10,0
Variation: 2,0
Tumble: 1,0
Tumble Rate: 2,0
Falloff: 1,0
Secondary: 1,0
Stream Motion: ON
Start: 0
Life: 40
Copy the particle system for the right wheel.
Link both Emitters to the car.
Open the Environment pannel and add a Particle Combustion effect with all colors set to dark grey shades.
Animate the Phase settings to get a smoke look.
Select the two particle systems to be used with Particle Combustion.
Create a Gravity Space Warp and bind to the particle systems.
Create a Wind Space Warp and bind to blow the particles a bit to the side.
Set the two Space Warps to get the desired smoke appearance.
For the white checkerboard create a rectangle, convert to Mesh, add UVW coordinates, and assign a white material with a B&W Checker Map in the Opacity channel.
You can set a Camera and a Spot Light to finish the scene.
Note that the wheels of the car are still not animated. If you need a more realsitic look and you use wheels with more detail, you can animate their rotation, too...
Have fun!
WHEELS OF FIRE
1997 (c) Copyright by Borislav "3DJ Bobo" Petrov
All Rights Reserved.