Q:
Where can I find some very basic MAX tutorials on the Web?
A:
This is the third TBT. It shows a quick way for modeling a Banana.
It works with any release of 3DS MAX and covers some basics of:
Shapes and Splines
Loft Objects and Deformations - Scale
Materials and Maps - Gradient
Utilities - Color Clipboard
Environment - Background color
The Banana
Start your 3DS MAX.
MAX 1.x only: Right-click on the Viewport's name saying "Perspective" and select the top entry of the drop-down list to get into Shaded mode.
Right-click in the "Front" viewport to activate it.
In the "Create" tab, click on "Shapes".
Click on "NGon" and create a shape.
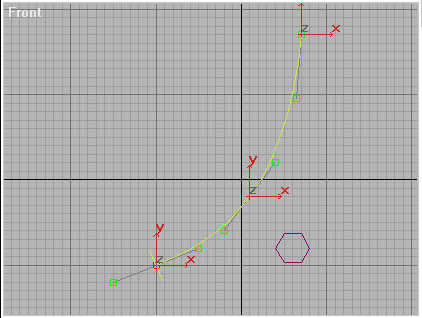
Click on "Line"
Click in the Front viewport to define the start of the spline.
Create two more vertices on the spline.
Go to Modify and apply an Edit Spline modifier - it will be in "Sub-Object" Vertex mode.
Select all vertices, right-click and set the Type to Bezier.
Set the tangent position as shown on the screenshot:
Click on "Sub-Object" to deactivate it.
Click on "Geometry" and select "Loft Object" from the drop-down list.
Select the Spline in the viewport.
Click on "Loft", click on "Get Shape" and select the NGon in the viewport.
Go back to the Modify tab.
Expand the rollout called "Surface Parameters".
Activate the "Apply Mapping" checkbox.
Expand the last rollout named "Deformations".
Click on Scale - a new window will be displayed.
Using the Icon "Insert Corner Point" create new vertices on the spline.
Select all vertices, right-click and set to "Bezier-Smooth".
Using the Icon "Scale Control Point" set the spline shape as shown on the screenshot:
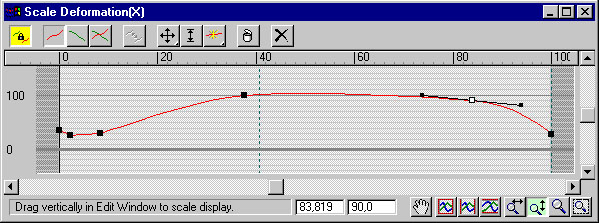
Note that you can watch the changes in realtime in the Shaded Perspective viewport.
Congratulations! You just made a Banana! Let's paint it now right...
Click on the Material Editor icon in the toolbar.  Select one of the sample spheres and click on the "Assign Material to Selection" icon.
Click on the square to the right of the "Diffuse" color swatch.
From the Map browser select "Gradient".
Click on the Icon "Show Map in Viewport".
Set the second color swatch of the Gradient to a shade of yellow.
Set the third color swatch of the Gradient to black.
Set the "Color 2 Position" to 0,3.
Click on the "Utilities" tab and select "Color Clipboard".
Click on the yellow color you set before, drag and drop into the color clipboard.
Click on the map slot to the right of the first color swatch.
From the Map browser select "Gradient" again.
Drag and drop the yellow color from the clipboard into the second and third color swatches of the new gradient.
Change the second color from yellow to a yellow-greenisch color.
Set the first color swatch to a shade of brown.
Set the "Color 2 Position" to 0,95.
Select one of the sample spheres and click on the "Assign Material to Selection" icon.
Click on the square to the right of the "Diffuse" color swatch.
From the Map browser select "Gradient".
Click on the Icon "Show Map in Viewport".
Set the second color swatch of the Gradient to a shade of yellow.
Set the third color swatch of the Gradient to black.
Set the "Color 2 Position" to 0,3.
Click on the "Utilities" tab and select "Color Clipboard".
Click on the yellow color you set before, drag and drop into the color clipboard.
Click on the map slot to the right of the first color swatch.
From the Map browser select "Gradient" again.
Drag and drop the yellow color from the clipboard into the second and third color swatches of the new gradient.
Change the second color from yellow to a yellow-greenisch color.
Set the first color swatch to a shade of brown.
Set the "Color 2 Position" to 0,95.
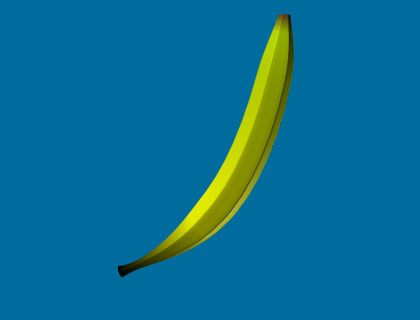
Click on the "Rendering" menu item and open the "Environment..." window.
Click on "Background Color" and set the background to blue.
You can press the Render button now to see the result:

If you have MAX 2, you can improve the image by setting the "Corner Radius" field of the NGon shape to a value higher than 0:
If you are using MAX 1.x, you can apply a MeshSmooth modifier to achieve a similar effect.