Batch Preview Renderer
The script searches for files in a given directory and renders a preview from the files found.
Ideal if you have a lot of model library and you dont know the content of the files.
Features:
- supports 3ds, obj, fbx and .max file formats
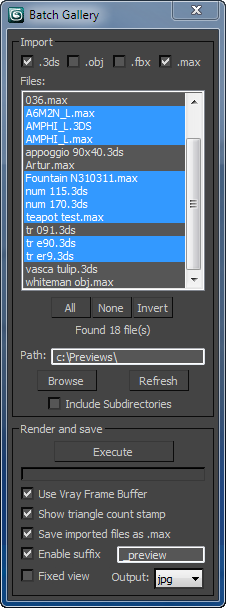
- lists the files found and there you can select from which files you would like to render a preview
- includes subdirectiories
- displays the progress
- supports Vray Frame Buffer (e.g. if you are using gamma this way) and when it is checked, the triangle count can be shown on the rendered preview
- saves the imported file in .max format (only imported files, it will not overwrite the .max files)
- adds a suffix after the name of the saved preview (often the name of a texture is the same as the name of the file, so in that case it will not overwrite the texture)
- the script always does a 'Zoom Extents Selected' on each file, so the rendered view will be same as in the active viewport before rendering
- moves the imported/merges objects the center and aligns it's bottom to the z = 0 coordinate
- searches for missing textures in the directories next to the file!
During testing I've noticed that some degenerated objects (like objects with 0 vertices, etc.) in the imported files could cause that the previous models will remain in the scene.
It is very rare, but maybe some of you met with this problem.
Unfortunately I can't prepare the script all of these things.
If you have any suggestion to improve or noticed something that needs to be corrected, please feel free to contact me or leave a comment.
Category: "G2Zs Tools"
Additional info:
v 0.52:
- "Fixed view" checkbox added, so all the rendering will be done from the same view (it will not execute 'zoom extents all' before each rendering)
v 0.55
- Added *.jpg, *.png, *.tga output formats
| Attachment | Size |
|---|---|
| batch_preview_ver0_55.ms | 8.35 KB |
Comments
Good idea. Added!
Good idea. Added!
Saving to PNG's would be really handy
Hey!
Thanks for this script! Great tool! Very useful for creating a lot of screenshots from your files! Is there any way you can make it save as a PNG with transparency in the background?
This would make it even more useful since images can be directly used instead of having to mask out the black background which come with the JPG's.
Doesnt wokr in 2011
Hi,
Sorry for late reply. No error messages just wont start up. Is there special procedure to use???
Thanks
Hi, I've added a 'Fixed view'
Hi, I've added a 'Fixed view' checkbox, so if you start the rendering from a camera view, the script won't change it.
Hi, I've wrote the script in
Hi,
I've wrote the script in max 2011. You've got any error messages?
develop
thanw for these kind of script.
will try to add a camera render fonction to it
Does this work in 2011???
From what i can see this isn't working in max 2011!!! If so is there any special things i need to do to make it work?
one image with multiple images
seems more appropriate (scripting wise)... ,afterall, one can crop the image , thus choosing the best view, but there will be some orientetation and zoom issues and aswell, 2 different angles and 2 different zooms and there we have 4x rendering time that might not even solve it so i would go for the manual mode anyday...it s upto you afterall :)
this manual mode can be optional for sure!
i am still using your script and the most critical issue i have right atm is the "left-over meshes from previous models" , see if i render an entire folder, the last 10 previews have meshes from previous models, the most critical issue for me atm...
Thanks
Hi,
Hi,
Thanks for your comment and the test scene!
I understand your suggestions.
Unfortunately I did not find a better way to cancel the rendering progress, not even in the help file, nor in forums.
Your other suggestion that a given view not always works for every model is also true, but the script was meant to be used on model libraries with hundreds or thousands of files. So setting the cameras for every object manually is not viable.
Models could have millions of poligons, so importing them into one file could eat up a lot of memory (suppose that we hide the other models during rendering, the render time will not increase).
I was thinking on that. A solution could be to this problem that the script renders more images about the model. For example renders the starting view, then rotates the model with 180 degree, and renders and another image. There could be tree or four different views by rotating the model with 120 or 90 degree.
After that the script could save every images and than the user chooses which one he (or she :)) would like to keep OR I think I could manage that the script saves just one image that contains more view.
What do you think about these ideas?
very good subject!
very simple script and a clean start.
first problem, it does not really cancel the renders, it just cancels the render but the next one begins there after.
Also have a suggestion.
the cameras... not all objects look meaingfull through a single camera. IMO, every imported object needs its own camera so...
so the script actually should
import all objects all together.
place/line them up by a spacing like 500 cm.
create camera for every imported files
all camera's target is aligned to the object center
adjust the scene's frame range according to number of objects.
wait for user to adjust cameras for better vieweing angles
on press"ok" start renders fro frame 0 to number of objects., every output is named as the imported file's name.
here s a sample scene i have just created. just have a look:)
http://dl.dropbox.com/u/35816487/asset_test.rar