OBJECTIVES:
My own experience shows that MAXScript is easier
than people think, and the biggest problem to learn and use it is to find
an idea to start. The following discussions will NOT teach you MAXScript
for Gurus. It will show you the basics and that there is nothing to be
afraid of - MAXScript is easy, flexible, and FUN even for non-programmers.
CONTENTS:
As Espen Sande Larsen suggested on the discreet Online
Forum, http://support.discreet.com.com
we will start with a short code that reads pixel
information from a bitmap and creates geometry based on the pixel data.
We will also see that the same code can be used to create a multitude of effects by just changing a single line.
In this first step, we are going to write just the
basic function code, not the interface (it will follow in LESSON
02).
Some values will be "hard-coded" in this first version,
and will become user-defined in the later versions.
The complete script source and the required bitmap
image (40x40x32bit) showing a single M on black background can be found
under
http://www.scriptspot.com/bobo/mxs2/mxs_tut/lesson01.zip
Download the ZIP file, create a new directory on
C: drive called "MXSTUT" and copy the content of the ZIP file into it.
Some words on the MAXScript (MXS) usage:
and press the [Enter] key in the NumPad (not the
Return key!) A new Box with default settings will appear at coordinates
[0,0,0]
work_bmp = openbitmap "c:\\mxstut\\m.tga"
A Bitmap is a MAX object and as every MAX object
used in MAXScript it is stored in a variable.
The openbitmap command opens an existing
image. The file type can be any type supported by MAX,
including animations (multi-frame bitmaps) like
AVI, MOV and IFL.
NOTE that you
have to use \\ instead of \ when specifying paths in MAXScript!
The image looks like this (scaled 3 times here):
bmp_w = work_bmp.width
bmp_h = work_bmp.height
We create two new variables to hold the current
size of the loaded image.
If you change the path to load a different image,
the script will still work correctly.
The user variable work_bmp represents
the bitmap object.
Every object in MAX has its own properties.
Properties are accessed by typing the object followed
by a dot "." and the property name.
To check what properties are available for a certain
object, you can either look in the Online Help or type
showproperties object
For example:
my_box = box ()
[Enter]
showproperties my_box [Enter]
.height : float
.length : float
.lengthsegs : integer
.width : float
.widthsegs : integer
.mapCoords : boolean
.heightsegs : integer
progressstart "Generating Objects..."
MAXScript provides some commands to display and
control a progress indicator.
We just started a new one.
It displays the prompt text and still does not update.
for h = 1 to bmp_h do
(
This is a LOOP which consists of a variable, a start
and end value.
The variable changes the value starting with the
start value and stops growing when the end value is reached.
Our variable h starts with 1
and ends with the last line in the bitmap, bmp_h
All statements following the DO statement
and between the brackets ( ) are repeated until the end value
is reached.
It is a good idea to use a REMARK like "--end
x loop" to denote the closing bracket so you can easily identify
closing brackets.
Also, you can indent the whole loop for visual clearness.
You can also click near a bracket and press the
Ctrl+B keys to invoke the "Bracket Balancer".
It shows the bracket pairs in the script by selecting
them and any code inbetween.
NOTE that
loops in MXS can be used in many different ways - to collect scene objects
etc.
pixel_line = getpixels work_bmp [0,(h-1)] bmp_w
We start reading the Bitmap now.
"pixel_line" is the user name of an
ARRAY that will hold a whole row of pixels.
An array is a one-dimensional list of values which
can be accessed using an index value.
All arrays in MAXScript are 1-based, this means
that the first element has index 1.
For example, the first pixel in our case wouldl
be accessed through pixel_line[1]
MAXScript uses dynamic arrays that change their
size and have automatic memory management as you add values to the list.
If you want to initialize an empty array, you have
to write my_array = #().
Since a MAXScript variable can be a scene object,
text string or number, you can for example build lists of scene objects,
or their names, or any of their numeric properies...
The getpixels command operates on the
bitmap object.
It expects two values for the X and Y coordinates
of the first pixel [X,Y] and a number of pixels to read (in our case
the width of the image)
This function is relatively slow, it is a good idea
to read as many pixels as possible into an array, and access the array
elements instead of
getting single pixels.
NOTE that other
than arrays, a Bitmap is a 2-dimensional 0-based list, where the first
pixel in the upper left corner has coords [0,0] and NOT [1,1].
You must keep this in mind when looping through
the image.
This is why we have the [0,h-1] instead of [1,h].
progressupdate (h as float /bmp_h *100)
We have already started a new progress indicator.
Now we will update it.
It accepts values between 0 and 100.(%).
By dividing the current loop value taken as a floating
point number through the end value, we get values between 0.0 and 1.0.
Multiplied with 100 it returns what we need - percentage
between 0 and 100.
The progress indicator can be also used to test
the Esc/Cancel user input, but we will skip this today.
for w = 1 to bmp_w do
(
Now we start a second loop inside of the first one
that counts from 1 to the last pixel in the row.
size_value = 100 + (pixel_line[w].r+pixel_line[w].g+pixel_line[w].b)/3
This line is the actual formula used to get a relation
between the pixels and the geometry we will create.
In the future, we will play
with different formulas to get lots of functions in the same script.
In this case, we take the Red, Green and Blue values
from the single pixel variable's color saved in the array.
We add them together and divide by 3.
Then we add 100 to have at least 100 units for our
geometry when the pixel is Black [0,0,0].
The value is thus based on the pixel's LUMINOSITY.
(Greyscale Intensity).
You could easily change the formula to something
like
size_value = 100 + (pixel_line[w].r)
In this case, only the red value will
be used.
Pure red, violet and yellow colors will
result in a value of 355 (100+255).
Any other colors with less Red components
will be lower, down to 100. (100+0)
new_object = box length:100 width:100 height:size_value
Now we create a new BOX primitive with length and
width = 100, and the already calculated value as height.
The new object is put into a new variable (as every
MAX object).
We can now access the object's properties through
variable name, dot, property name:
new_object.pos = [w*100, (-h*100), 0]
The .POS (or .POSITION)
property defines the position in 3D space of any geometry object.
We use a Point3 value in the form [X,Y,Z]
to specify 3D coordinates.
NOTE that in
MAX, [0,0,0] is lower left corner when seen from the Top Viewport
In images, the UPPER left corner is [0,0] - this
explains the sign in (-h*100)
100 is the distance between objects.
new_material = standardmaterial diffuse:pixel_line[w]
We create a new standard material with diffuse color
taken from the pixel's color.
The material is also a MAX object saved in a variable
and has its properties.
new_object.material = new_material
We change the .MATERIAL property of
the new object - we assign the new material variable to it.
)--end w loop
Before the w loop has finished, the script WILL
NOT go any farther...
)--end h loop
Everytime the w loop finishes, the h loop increases
by 1. After it has finished, the script goes on...
progressend ()
We hide the progress display now.
close work_bmp
We also close the bitmap.
HEY, WE ARE READY!
This is what you should get after executing the script (Ctrl+E):
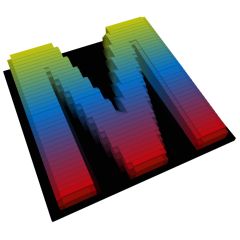
In the next LESSON 02, we will create a User Interface to the utility, and define some variables to achieve different effects.
Have fun!
Borislav Petrov [FA]