CONTENTS:
In this fifth step, we are going to add animation
capabilities to the utility.
We are going to use mulitframe bitmaps (animations)
to kreate keyframes at different times.
The complete script source can be found under
http://www.scriptspot.com/bobo/mxs2/mxs_tut/lesson05.zip
Download the ZIP file and copy its content into the
same directory as in LESSON 01.
utility lesson05
"Lesson05"
(
group "About..."
(
label lesson_label01
"Lesson 05 Script"
label lesson_label02
"by Borislav Petrov"
label lesson_label03
"Kinetix Forum Assistant"
)
group "Settings:"
(
radiobuttons
geom_mode "Geometry" labels:#("Box","Sphere","Color-Per-Vertex Mesh") align:#left
dropdownlist
effect_mode "Effect Source" items:#("Luminosity","Red Channel","Green Channel","Blue
Channel","Alpha Channel")
spinner sphere_segs
"Sphere Segments:" range:[4,16,4] fieldwidth:40 align:#right type:#integer
enabled:false
spinner base_size
"Base Size:" range:[1,1000,100] fieldwidth:40 align:#right
spinner multiplier
"Effect Multiplier:" range:[0.1,10,2] fieldwidth:40 align:#right
spinner nth_pixel
"Every Nth Pixel:" range:[1,10,1] fieldwidth:40 align:#right type:#integer
button get_image
"Get Image File" width:140
edittext bmp_name
"File" text:"c:\\mxstut\\m.avi"
The name of the
default file has changed to m.avi which has 10 frames of animation.
label size_label
"Image Size:???x???"
label frame_label "Frames:?"
This new label is going to display the
number of frames in the selected bitmap.
checkbox use_frames "Create Animation"
checked:true enabled:false align:#center
In case there are more than 1 frames in
the bitmap, this checkbox will become enabled.
It will let the user turn Animation on
and off.
)
group "Action"
(
button start_process
"LET'S DO IT!" width:140 height:30 align:#center enabled:false
button remove_all
"Clean up scene" width:140 align:#center
)
fn Check_bmp_size
bmp_n =
(
try
(
bmp_check
= openbitmap bmp_n
bmp_w =
bmp_check.width
bmp_h =
bmp_check.height
num_frames
= bmp_check.numframes
This variable will
hold the number of frames as derived from the .numframes property
of the bitmap.
close bmp_check
size_label.text
= "Image Size:" + bmp_w as string + "x" + bmp_h as string
frame_label.text
= "Frames:"+num_frames as string
We put the number
of frames into the label.
if num_frames
> 1 then use_frames.enabled = true else use_frames.enabled = false
In case there are
more than one frames, the checkbox becomes enabled.
)
catch
(
start_process.enabled
= false
)
)
on geom_mode changed
state do
(
if state == 2
then sphere_segs.enabled = true else sphere_segs.enabled = false
)
on bmp_name entered
txt do
(
file_check
= getFiles bmp_name.text
if file_check.count
== 1 then
(
start_process.enabled
= true
Check_bmp_size
bmp_name.text
)
else
(
size_label.text
= "Image Size:???x???"
start_process.enabled
= false
)
)
on get_image pressed
do
(
pick_image =
selectBitmap caption:"Get Image File"
if pick_image
!= undefined then
(
bmp_name.text
= pick_image.filename
start_process.enabled
= true
Check_bmp_size
bmp_name.text
)
)
on start_process
pressed do
(
work_bmp = openbitmap
bmp_name.text
bmp_w = work_bmp.width
bmp_h = work_bmp.height
progressstart "Generating Objects..."
mesh_verts = #()
mesh_cpv = #()
nodes_array =
#()
This new array will
be used to hold all objects we create in Box and Sphere mode.
Later on, when applying
animation, we will use this array to access every single object.
for h = 1 to bmp_h
by nth_pixel.value do
(
pixel_line
= getpixels work_bmp [0,(h-1)] bmp_w
if not
progressupdate (h as float /bmp_h *100) then exit
for w =
1 to bmp_w by nth_pixel.value do
(
case effect_mode.selection
of
(
1: size_value
= base_size.value + multiplier.value*(pixel_line[w].r+pixel_line[w].g+pixel_line[w].b)/3
2: size_value
= base_size.value + multiplier.value*(pixel_line[w].r)
3: size_value
= base_size.value + multiplier.value*(pixel_line[w].g)
4: size_value
= base_size.value + multiplier.value*(pixel_line[w].b)
5: size_value
= base_size.value + multiplier.value*(pixel_line[w].alpha)
)
case geom_mode.state
of
(
1: (
new_object = box length:base_size.value width:base_size.value height:size_value
append
nodes_array new_object
We put the newly
created object into the array.
)
2: (
new_object = sphere radius:(size_value/2) segs:sphere_segs.value
append
nodes_array new_object
Same as above.
)
3: (
append mesh_verts [w*base_size.value, (-h*base_size.value), size_value]
append mesh_cpv pixel_line[w]
)
)
if geom_mode.state
!= 3 then
(
new_object.pos
= [w*base_size.value, (-h*base_size.value), 0]
new_object.name
= uniquename "5th_Lesson"
new_material
= standardmaterial diffuse:pixel_line[w]
new_material.name
= new_object.name
new_object.material
= new_material
)
)--end w loop
)--end h loop
if geom_mode.state
== 3 then
(
new_object
= mesh length:(bmp_h*base_size.value) width:(bmp_w*base_size.value) lengthsegs:(bmp_h/nth_pixel.value-1)
widthsegs:(bmp_w/nth_pixel.value-1)
setnumcpvverts
new_object mesh_cpv.count
for i =
1 to mesh_verts.count do
(
setvert
new_object i mesh_verts[i]
setvertcolor
new_object i mesh_cpv[i]
)
normal_mod
= normalModifier flip:true
addmodifier
new_object normal_mod
collapsestack
new_object
defaultVCfaces
new_object
update
new_object
new_object.name
= uniquename "5th_Lesson"
vert_color
= Vertex_Color ()
new_material
= standardmaterial diffusemap:vert_color
new_material.name
= new_object.name
new_object.material
= new_material
new_object.showvertexcolors
= true
)
progressend ()
We have to end the progress indicator
here.
We will have new progress indicators for
the animation creation.
if num_frames > 1 and use_frames.checked
then
(
We check for animation - if there are
more than one frames and the user has decided to use them, we go on...
if geom_mode.state == 3 then animatevertex
new_object #all
The animatevertex command creates animation
tracks for vertices in an editable mesh.
This function is new in MAX 2.5 - in R2,
the user had to create animation tracks "by hand".
This makes our script MAX 2.5 specific...
animate on
(
We start an ANIMATION CONTEXT - in the
body of this statement, any changes will create keyframes.
It is equal to pressing the Animate button
in MAX; but it works internally without the red pressed button displayed...
for t = 1 to num_frames do
(
This loop will go through all frames in
the bitmap.
progressstart ("Animating Frame "+t
as string + " of "+num_frames as string)
We start a new progress indicator wilsting
the current frame and the total frames.
gotoframe work_bmp t
This command repositions inside the bitmap
- it changes the current frame.
mesh_verts = #()
mesh_cpv = #()
Same is in the geometry
creation code.
node_counter = 0
This counter is initialized here and will
point at the current object as we go through the object array.
anim_len = (animationrange.end - animationrange.start)+1
This variable stores the total number
of frames in the active animation segment.
The animationrange system
variable returns the active segment as INTERVAL [start,end]
You can access the .start and
.end
properties to get the respective frames.
anim_delta = anim_len/num_frames
This is a relation between the length
of the bitmap animation and the scene animation.
at time (t*anim_delta)
(
The at time statement repositions us in
the scene time - any changes to the scene occur on the respective frame.
It is similar to moving the time slider.
By multiplying the bitmap frame and the
relation value we get the correct frame to apply the animation.
for h = 1 to bmp_h by nth_pixel.value
do
(
pixel_line = getpixels work_bmp
[0,(h-1)] bmp_w
if not progressupdate (h as float
/bmp_h *100) then exit
for w = 1 to bmp_w by nth_pixel.value
do
(
The above lines are the same as in the
geometry creation code.
node_counter += 1
We increase the counter by one with every
single pixel read...
The above reads: "Add 1 to the cirrent
value of the variable".
case effect_mode.selection of
(
1: size_value = base_size.value
+ multiplier.value*(pixel_line[w].r+pixel_line[w].g+pixel_line[w].b)/3
2: size_value = base_size.value
+ multiplier.value*(pixel_line[w].r)
3: size_value = base_size.value
+ multiplier.value*(pixel_line[w].g)
4: size_value = base_size.value
+ multiplier.value*(pixel_line[w].b)
5: size_value = base_size.value
+ multiplier.value*(pixel_line[w].alpha)
)
This is the same as in the geometry creation
code.
case geom_mode.state of
(
1: (
nodes_array[node_counter].height=size_value
We access the current box from the array
and change the height to the new value from the new frame.
nodes_array[node_counter].material.diffuse=pixel_line[w]
We also access the material of the box
and change the diffuse color to the color of the pixel in the new frame.
)
2: (
nodes_array[node_counter].radius=(size_value/2)
nodes_array[node_counter].material.diffuse=pixel_line[w]
Same as above
)
3: (
new_object[4][node_counter].value = [w*base_size.value, (-h*base_size.value),
size_value]
This is an example of an indexed TrackView
access - each object is represented in TrackView by a tree of tracks.
You can access them by index, in our case,
index [4] is the Mesh Object itself, and the [node_counter]
index is the respective vertex animation track.
We assign the new value directly to the
track and MAXScript creates a key.
NOTE
that there is no way to animate VertexColors in the Mesh since there are
no tracks representing the UVW2 texture/color vertices.
You can apply the same animation as Bitmap
Texture with slow motion to get a similar effect.
)
)--end case
)--end w loop
)--end h loop
progressend ()
)--end at time
)--end t loop
)--end anim on
)--end num_frames
max views redraw
close work_bmp
)--end on button
pressed
on remove_all
pressed do
(
q_answer = queryBox
"You are about to delete all objects\ncreated by the Utility.\nAre you
sure?"
if q_answer then
(
delete_array
= $5th_Lesson* as array
delete
delete_array
)
)
on lesson05 open
do
(
file_check
= getFiles bmp_name.text
print file_check.count
if file_check.count
== 1 then
(
start_process.enabled
= true
Check_bmp_size
bmp_name.text
)
else
(
messagebox
"The Image file couldn't be found!\nPlease select a valid one."
)
)
)--end utility
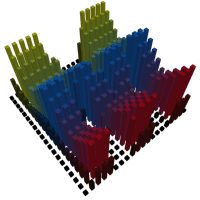
Here is what happens when you execute the
script with the animation creation,
Box, Blue Channel, Base 100, Scale 10.0,
Nth 2
Have fun!
Borislav Petrov [FA]