CONTENTS:
In this second step, we are going to write the User
Interface.
Some "hard-coded" values will be changed to user-defined
variables controlled by UI elements.
The complete script source can be found under
http://www.scriptspot.com/bobo/mxs2/mxs_tut/lesson02.zip
Download the ZIP file and copy its content into the
same directory as in LESSON 01.
Some words on the MAXScript User Interface Objects:
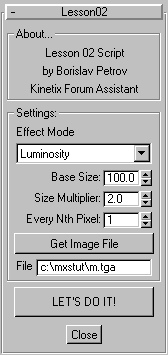
utility lesson02 "Lesson02"
(
A scripted Utility starts with the statement
utility
followed by a unique name and a string for the Rollout caption.
The bracket starts the utility, and a
second ) bracket closes it at the end of the file.
group "About..."
(
label lesson_label01 "Lesson 02 Script"
label lesson_label02 "by Borislav Petrov"
label lesson_label03 "Kinetix Forum
Assistant"
)
A group statement creates
a border around a group of UI elements.
It is a nice separator used to keep similar
functions together.
A label is a UI element
placing a non-user-definable text into the rollout.
It is followed by the variable name holding
the label object, and the text to be displayed.
You can change the text in the label via
MXS by accessing its .text property, but the user cannot
edit the text.
It is used to display system messages
and informations.
group "Settings:"
(
dropdownlist effect_mode "Effect Mode"
items:#("Luminosity","Red Channel","Green Channel","Blue Channel")
A dropdownlist shows a single
entry at a time, but can hold multiple entries defined in the items
array.
The statement is followed by the variable
name and the caption text.
The drop-down list is used to select items
from a list.
The .selection property
returns the index of the selected item.
spinner base_size "Base Size:" range:[1,1000,100]
fieldwidth:40 align:#right
The spinner UI element provides
a value field with arrows for setting numeric values.
The range:[start,end,default]
provide control over the ranges allowed by the programmer.
The fieldwidth is used in
many UI elements. This is the size of the imput field only.
The align:#right lets any
UI element become right-justified.
You can also use the keywords #left
and #center
This spinner defines the base size of
the geometry objects - what used to be 100 in LESSON 1 can be now customized.
spinner multiplier "Size Multiplier:"
range:[0.1,10,2] fieldwidth:40 align:#right
This value defines a multiplier value
used to scale the height of the boxes up or down.
It will multiply the color value derived
from the pixels
spinner nth_pixel "Every Nth Pixel:"
range:[1,10,1] fieldwidth:40 align:#right type:#integer
This value defines a step for both loops.
If the value is higher than 1, the loops
skip every Nth pixel/row
The type:#integer statement
forces the value to be an integer without a decimal part.
button get_image "Get Image File" width:140
A button UI element lets
you start actions when pressing it with the mouse.
The width:140 sets the horizontal
size of the button to the full width of the group.
This button will be used to select an
Image path/file to use in the script.
edittext bmp_name "File" text:"c:\\mxstut\\m.tga"
The edittext field provides
place for user text input.
Its text is preset to the name of the
default bitmap to use, and can be typed in manually by the user, or chenaged
by the script itself.
)
button start_process "LET'S DO IT!"
width:140 height:30
This button will start the function written
in LESSON 01.
Its height is set to 30
to give it the important look of the main switch.
on get_image pressed do
(
The on statement provides
a way to scan for user actions.
In this case, it monitors the button get_image
and
executes the statements after DO in case it is pressed.
pick_image = selectBitmap caption:"Get
Image File"
The selectBitmap command
opens the standard MAX Bitmap pick dialog with the respective caption.
The variable pick_image becomes
equal to the bitmap object picked by the user.
if pick_image != undefined then bmp_name.text
= pick_image.filename
The if ... then...else construction
is used to make decisions based on boolean values.
When the statement after the if
is
TRUE, the statements following then are executed.
Optionally, when the if clause
is FALSE, the statements following else are executed.
We have just the first part, the if...then
construction.
The variable will have the value UNDEFINED
in case the User has canceled the selection.
If the returned value is a valid bitmap
object, its .name property is assigned to the text in the
edittext field.
!= means "NOT EQUAL"
)
on start_process pressed do
(
This line monitors the main button - in
case it is pressed, the main code is executed.
work_bmp = openbitmap
bmp_name.text
bmp_w = work_bmp.width
bmp_h = work_bmp.height
progressstart "Generating Objects..."
for h = 1 to bmp_h by nth_pixel.value
do
(
Here we have included an additional statement
by
defining the step to increase the loop variable.
If nth_pixel.value is 2,
the loop will go like 1,3,5,7,9...
pixel_line
= getpixels work_bmp [0,(h-1)] bmp_w
progressupdate
(h as float /bmp_h *100)
for w = 1 to bmp_w by nth_pixel.value
do
(
The by statement is included
in this line, too.
case effect_mode.selection of
(
1: size_value = base_size.value
+ multiplier.value*(pixel_line[w].r+pixel_line[w].g+pixel_line[w].b)/3
2: size_value = base_size.value
+ multiplier.value*(pixel_line[w].r)
3: size_value = base_size.value
+ multiplier.value*(pixel_line[w].g)
4: size_value = base_size.value
+ multiplier.value*(pixel_line[w].b)
)
The case statement provides
a more compact way for decision making.
Instead of writing if effect_mode.selection
== 1 then ..., if effect_mode.selection == 2 then ..., etc.
you can use a single test and a list of
options based on the value used in the case statement.
When the dropdown list provides a selection
number 1, the first line will be calculated only.
The formula is similar to the one in LESSON
01, but includes the additional multiplier.value to scale
the Z size
The other 3 options calculate the variable
based on single color channels.
new_object = box length:base_size.value
width:base_size.value height:size_value
new_object.pos = [w*base_size.value,
(-h*base_size.value), 0]
The old 100 constant is now replaced by
the value of the variable base_size we defined in the
UI
new_object.name = uniquename "2nd_Lesson"
In this version, each new object receives
an unique name with the base "2nd_Lesson".
MAXScript adds the lowest number
available to it to create a new unique name.
new_material = standardmaterial diffuse:pixel_line[w]
new_material.name = new_object.name
The name of the newly created material
is set to the name of the object it is assigned to.
new_object.material = new_material
)--end w loop
)--end h loop
progressend ()
close work_bmp
)--end on button pressed
This is the end of the main code
)--end utility
The utility definition ends here. We are
ready to use the script!
To start the script, press Ctrl+E - a
new entry will appear in the drop-down list of MAXScript.
Select the name "Lesson02" from the list
to open the utility.
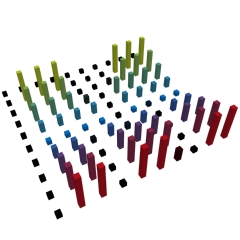
Here is what happens when you execute the script using only the Red Channel info, Base 100, Scale 3.0, Nth 4
In the next LESSON 03, we will extend the utility's capabilities.
Have fun!
Borislav Petrov [FA]