3dhippie_stereoCam
VERSION 2 AVAILABLE:
Get 3dhippie stereocam v2
ADDED in 2.1.2
Camera Clipping.
Bugfixes.
ADDED in 2.1.0
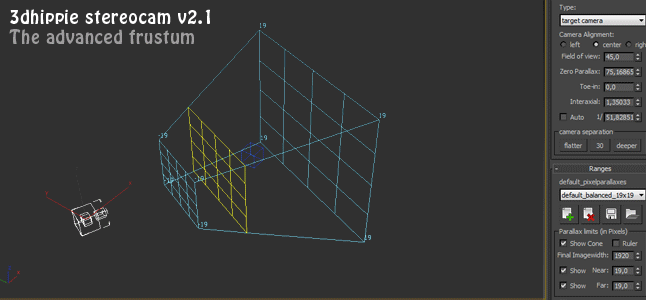
The advanced frustuum: Displays pixel parallax values at each corner.
Click and move the planes to adjust either pixel values or the interaxial and zero parallax by going into manipulate mode.
Just set the nearplane and farplane spinners to the desired values and the interaxial will adjust itself.
AND MUCH MORE!
Watch the detailed video on vimeo: http://vimeo.com/57398627
Other improvements include, better gamma handling, bugfixes.
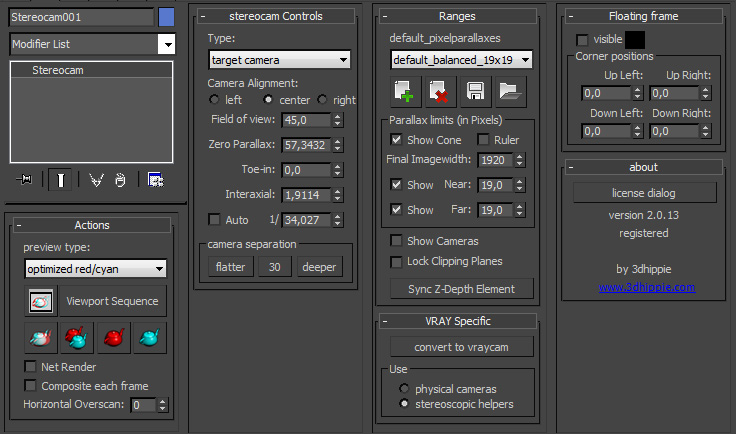
- Adjustable Planes NEW !
Move the nearplane, farplane or screenplane to affect either pixel values or depth. Scroll down to the second video to learn more about it. -
Real camera plugin
You can create and move it like a standard targetcamera or use a convert macro if you prefer the old technique. -
Preview speed
This has been improved fundamentally. A Full-HD frame optimized anaglyph takes less then a second, making it much more attractive to render anaglyph previews. -
Alignment (PRO).
The stereocam can now be aligned to left, center or right side, so you only need to rerender one camera if you made adjustments. It is also very useful if you want to convert old short films to 3D with less rendertime. -
Pixel parallax presets.
Choose from and create new pixel parallax presets to get the 3D just right. -
Great Vray-Implementation.
The stereocam can be switched to VRay with the click of a button and offers you the choice of using two physical cameras or the stereoscopic helpers. -
Horizontal overscan (PRO)
Render your images wider without affecting the field of view and have the ultimate control over your depth in the post. -
Net rendering
Send jobs to the network just like any other camera.
-
Stereoscopic viewport preview
Watch your viewport in 3D while working. All changes will be immediately reflected in the stereoscopic window. -
More compositing types
Choose from red/cyan, magenta/green, or amber/blue with monochrome, half-color or optimized algorithm. -
Stereoscopic player connection (PRO)
Utilize the power of the stereoscopic player from 3dtv.org .View and adjust either your interactive viewport preview or the rendered results from within the Stereoscopic player offering you even MORE compositing types (e.g. quad-buffered opengl, nivision, iz3d). -
Realtime zero parallax adjustments (PRO)
Adjust the zero parallax even after you rendered! Just shift the images until the desired depth placement is reached, hit „sync“ and the rig will accomodate to your changes. - Stereoscopic animated viewport sequence (PRO)
Make an animated viewport sequence in full-HD. You can generate a 3D-Clip or use the stereoscopic player connection.
INSTALLATION
Please close 3ds Max prior to installing the plugin. To install 3dhippie stereocam v2 run the appropriate installer:
3ds Max 2011 and 3ds Max 2012 -> 3dhippie_stereocam_v2.exe
3ds Max 2013 -> 3dhippie_stereocam_v2_2013.exe
Follow the installation instructions and agree to the license.
IMPORTANT: Choose the main 3ds Max directory as the installation directory (e.g “C:\Program Files\Autodesk\3ds Max 2013”)
Start (or restart) 3ds Max and enjoy the product.
DOWNLOAD
The stereocam comes in 2 versions: A FREE License and a PRO License. The FREE license is very advanced already and has the most important features included. The PRO license has a lot of additional features that are extremely useful if you are serious about 3D.
You can download the FREE version here: DOWNLOAD
Order a PRO license for only 125€ here .
Comments
V-ray
How can we use this 3dhippie camera for V-Ray 3.0...??
Plz reply as soon as possible very urgent.
It would be a great help.
email: [email protected]
Nice tools
If add 8 views and 9 views.That's perfect.
+1
I like this camera advanced tool. Awesome job,man
Keep up the good work!
Cheers!
bga
Oh! I will correct that typo
Oh! I will correct that typo immediately. Thank you very much.
www.davidshelton.de/blog
Minor niggle-point - It's
Minor niggle-point - It's "Frustum", not "Frustrum"
Amazing Script!
This is one of the best 3d stereo cam scripts i've seen. might be nice to make it a plugin.
this will come in handy!
Some things I'd like to see which would be nice would be
-A quick preview based on viewport instead of rendering it.
- not needed, but would be nice is 3d vision support for previewing
this one i think really would help
- final render output of cross eyed. maybe even save as jps and mpo
just some thoughts. Really loving this script. you've done an amazing job!
Great great script, thanks
Great great script, thanks again !
--
CG Generalist
Seems to be a great
Seems to be a great maxscript. (not yet tested for now)
I had to modified the script to make it work on my french version of 3dsmax : replace "vertex9" by "sommet9".
Thanks for your script.
--
CG Generalist
Network rendering, and virtual frame buffer.
Hello David!
I don't understand something with the network rendering, and with a virtual frame buffer.
When i render the single image at the modifier stack (and hit -preview), the final image is perfect. But when i render it with the render setup dialog box, and i working with network rendering, i become only the single image, and not with the second, or the final composited image.
How can i set the render with network rendering? Can i save the virtual frame buffer?
Can you explain how it works?
I working with 3dsmax 2010, vray 1.5sp4a.
Thank for your help!
Balázs
THANK YOU
Thank you , the script is perfect