AO Render with alpha support
-- update -
The script only rendered single frames - it is now written to look at common parameters and render either activetimesegment or range (depending on what is set) the frames will be saved to whatever is defined in Render Output but it will append "AO" to this in case you want to quickly render to the same location.It will of course still do single frames as well
Also slight other things fixed - also it will keep whatever sampling quality you have set in the render panel.
Next to get into this will be Multi Material support when "use selection for alpha" is set and seeing if I can get displacement supported.
-- please let me know if this has been valuable to you and such I'd appreciate it and any feedback you might have. I would like to take this as a learning experience.
This was a rather quick script created to resolve having to turn off multiple setting to render an AO and to integrate some support for cut-out/alpha channels while rendering an Ambient Occlusion map. As well to handle the unfortunate issue that when a few of the staff would render an AO, they would notice corrections needed in the main render, so it renders in a new vfb (or whatever it is called now) and allows crops and regions to be done on the previous virtual frame buffer.
The idea for the alpha-channel support was gotten from Rammy Hanna, so kudo's to him for the idea. If this turns out to be useful, please let me know and if there are any problems or updates needed please do let me know and I will update as rapidly as possible.
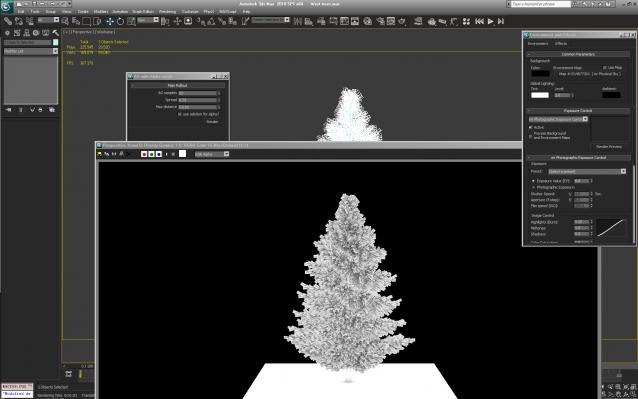
Example of using this option follows:
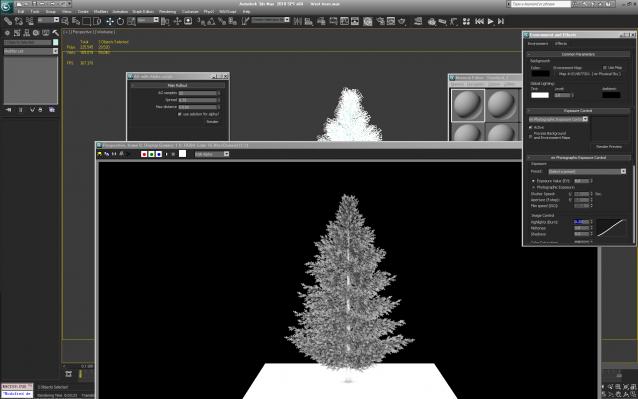
As opposed to:
I published it under the fsf.org GPL2 license (throw back from my coding days what can I say). The only caveat is that when you use the "use selection for alpha" you must have an object selected that only has one material on it of A&D type... but as many objects and materials as you want. Please let me know. Tks!
it's a macroscript "Utilities" "AO Render"
When you hit your quick key it will pull up a rollout - set your AO settings and hit render.
If you need a cut out rendered - check the button select the objects and render away. See examples below to see the result.
As a note: It will get and re-set all mental ray render settings, as well as exposure control, gamma, environment map state and will ignore render elements for the AO Render.
It only supports usage of "cutout map" in an A&D Material I assume I could get it to work with standard materials as well if someone needs it.
| Attachment | Size |
|---|---|
| utilities-aohandler.mcr | 4.42 KB |
Comments
Very kind of you, thanks!...
Very kind of you, thanks!... give me a little time and I'll have it all in there... hope you like it just mid a project... :( but it's a fun project :)!
How about integrating an
How about integrating an rollout with these settings ?
/ Raymond
Great!
Great!
You do not have to do all the
You do not have to do all the changes I suggested.
It was only meant as suggestions for your script. :)
I personaly render out Ambient Occlussion layers every day on my job.
I often switch between Box/Gaus & Mitchell/Lanczos depending on how much time I have on the project. Box/Gaus provides a quick rendered picture, while Mitchell/Lanczos produce sharper pictures with longer rendertime(Lanczos and SpatialContrast with 0.004 is what I use mostly, when i have little time i just let the spatial contrast values at 0.051).
Here is an example i found on changing renderfilters By the way(if you are interested): http://forums.cgsociety.org/showthread.php?t=953987
Seperate rollouts is fine to.
/ Raymond
Fantastic! Thank you for the
Fantastic! Thank you for the feedback and requests. Sounds good. Hmmm... sounds pretty simple. the frame sequence makes sense. but now on all the settings, frame buffer type, AA filter, and Spatial contrast what if the script would just take the existing settings (set in the render panel) for that? Would there be a major beneficial reason to have the settings separate?
Or coming to think of it I could have a separate roll out that lets one change them if need be but otherwise takes the existing frame sequence and save path and just adds "+ AO" or whatev..
What do u think?
Thank you. Some sugestions to
Thank you.
Some sugestions to expand you script more:
1. SpatialContrast at 0.004 gives you a smooth and nice AO (FYI: Longer Rendertime)
2. Make it possible to render animated sequence (Type in start / End)
3. option to change between AA filters (Box, Gauss, Triangle, Mitchell, Lanczos)
4. Frame buffer type options? (16 / 32 bit)
/ Raymond