AvizStudioTools - A2Dimage
Version:
1.21
Date Updated:
06/20/2022 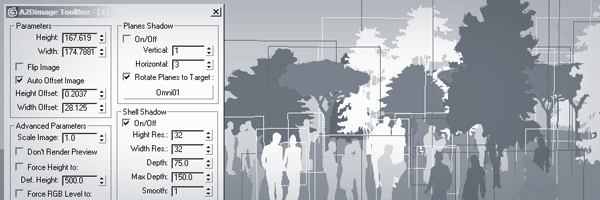
A2Dimage is a scripted 3ds Max plug-in for adding simple 2D images with alpha channel to your 3ds Max scene. Script reads the height of the image from the end of the file name and on render generate automatically shadows based on alpha channel of the image. With this script you can render fast previews and final images with correct shadows in one pass without compositing all individual elements later.
Additional Info:
|New in version 1.21:
- Free 15 Day Trial for the Pro version
- Fixed "Rotate all to camera" option
- Fixed UI alignment in create and modify
- Fixed other small bugs
New in version 1.20:
- Two new materials types
- Additional shortcuts to change the file for the object
- When using V-Ray DR, the shadows are generated correctly before the file is sent to other render nodes
New in version 1.15:
- Option to search for missing bitmaps in the object’s material
- Other small bug fixes
New in version 1.12:
- Two new material options - Mental Ray & Maxwell
- Relink Pro Tool - Relink A2Dimage from folder base on best match algorithm
- Scatter Pro Tool - Scatter A2Dimage objects by replacing existing object. Watch video here
- Convert Pro Tool - Convert A2Dimage objects and shadows in editable mesh
New in version 1.10:
- Fix image preview in some versions of 3ds Max
- Batch render with Vray now works. For other renderers see Camera Overwrite Pro Tool
- New Pro Parameters and Tools:
- Color Multiply
- Viewport Preview
- Fast Shadow Cache
- Fast Shadow Calculation
- Camera Overwrite
- Relink A2Dimages
New in version 1.03:
- Fix the orientation of A2Dimage objects in orthographic views
New in version 1.02:
- Option for V-Ray materials
- Disable Bitmaps Filtering
- Reuse Scene Materials
- Auto rotate to the camera in the viewport
Installation:
- Download and unzip the desired version
- From 3ds Max menu select: MaxScript> Run Script ...> AvizStudioTools_A2Dimage.mse
- If you want to load the script automatically, copy the content of the archive in the 3ds Max root folder\scripts\startup\
Version Requirement:
3ds Max 7 or later
Comments
something is wrong with gamma\RGB levels
1.The A2images objects look too dark in the render output (though the matslot and
viewport look overexposed).
Setting the RGB level at ~15 (adv. parameters) solves this problem, but creates
over-lighted areas around the object).
Could you fix it please?
( BTW I use 'linear gamma workflow':
In the Max preferences:
Gamma 2.2, input 2.2, output 1
Vray color mapping rollout: gamma set 2.2)
2. Could you please add 'don't generate vray GI' option?
P.S. Man this plugin is awesome! Huge thank you!
Thanks
Thanks for suggestions and comments.
To harumscarum: Thanks for your time end effort for writing this code. In the next version I'll try to add such functionality built-in the script.
www.avizstudio.com
camera (perspective) orientation
here is simple script to make A2Dimage objects always perpendicular to axis of view in viewport
would be great if it could be part of your tool (currently it must be in scripts/startup folder)
+1 match to camera
+1 match to camera orientation....
Scene from demo video
Download the scene from A2Dimage demo video (high res shadows are built-in and can be rendered with standard version of the script).
www.avizstudio.com
+1
Thanks for very useful script.
bga