RemapPSD
With RemapPSDyou can easily map your entire photoshop file to a different set of uvs. The script will handle any complexity in your photoshop files:
- layers with masks
- folders with masks
- nested folders
- adjustment layers with masks
- layered tiffs
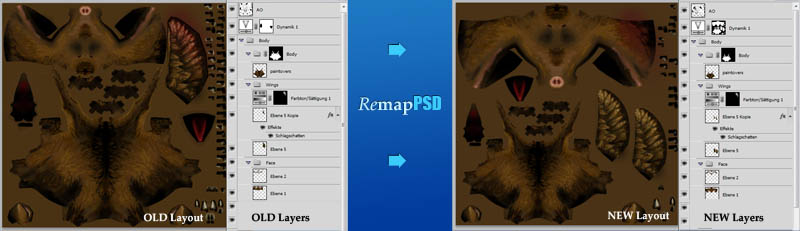
An example case: You have worked on a lowpoly game character and are almost done when the lead artist approaches you with the request to give the character's face more space on the texture. This is not so difficult if you are working on a flat image, but impossible to do with complex photshop files. With RemapPSD it's inredibly easy. You can change the uv-layout of an existing model and the psd file with all the layers, folders, adjustment layers, masks etc, will be remapped with just the click of a button.
I hope you will find it just as helpful as I do. To get started it is probably best to watch the video tutorial on vimeo:
INSTALLATION:
- Select Maxscript/run and choose „RemapPSD.mzp“
- You will find the macroscipt under customize in the category „3dhippie“. Assign it to a shortcut or make a new menu item.
USAGE:
Basically you need three things to make the script work.
- Any piece of textured geometry
- Two sets of UV's: Channel 1 for the old mapping, Channel 2 for the new mapping
- A standard material with a bitmap texture as it's diffuse map
RemapPSD will do the rest for you.
The script will run through four phases:
- Photoshop will pop up, open the document, save it under „[originalname]_remapped“ and do some preparations.
- Back in 3ds Max render to texture will render all layers.
- Photoshop will collect all rendered images and update the psdfile.
- In 3ds Max the original object's material will be updated to use the remapped psd file.
That's it. You can now continue working on your psd file which will be organized just the same as before, with all layers, adjustment layers, folders and so on.
LIMITATIONS
You cannot remap vector elements, such as vector masks, or text layers, or smartobjects. All of those elements will be rasterized.
Long layernames will be truncated.
SATISFIED?
If this script has saved your life maybe you could donate me some money? I have setup a paypal donation button on my blog: http://davidshelton.de/blog/?p=249
I am looking for part-time or full-time positions as a 3d generalist in the games or films industry, as well as for freelance jobs. Please take a look at my current showreel:
If you have comments or critique, you are always welcome to write me a line. I can't promise that I will implement new feature requests, but I will try my best.
History:
[0.1]
2011-12-02
first release
[0.2]
2011-12-03
- fixed problem with too long layernames (more than 31 characters)
- fixed error when trying to clear an adjustment layer
- fixed error caused by slashes in layernames
- fixed spelling error in messagebox
[0.3]
2011-04-26
- fixed problem with slashes in remapped_name variable (thanks to Pixhellmann)
[0.4]
2012-07-06
- fixed problem where projection was turned off and automatic unwrap got applied.
[0.5]
2013-04-03
- checked with Photoshop CS6
- fixed issues with empty layers
- cleaned photoshop history
- fixed issue with wrong settings in RTT dialog
- fixed issue with forwardslashes in layernames
- improved general stability
[0.6]
2013-04-30
- fixed bug when render to texture dialog wasn't opened (thanks trebor777)
[0.7]
21.05.2013
- removed unneccessary command and execute steps. Compatibility to 3dsmax 2012 established.
[0.8]
2013-05-31
- Proper handling of premultiplied alphas (no more black halos).
- fixed bug that occured when the baked layer's alpha was empty
| Attachment | Size |
|---|---|
| remappsd.mzp | 8.93 KB |
Comments
Niice! Thanks for sharing the
Niice! Thanks for sharing the code, I'll enjoy to have a look at it and learn something hopefully. I am curious, may you want to lose a few words on how this works?
Never get low & slow & out of ideas
Hey, thanks Norman3D. My
Hey, thanks Norman3D. My first donation :-). Hope there will be more to follow. Initially I wanted to encrypt the script, now I am happy I didn't.
I have updated the script so if you haven't tried yet, go and update first.
www.davidshelton.de/blog
hehe awesome man! I'm going
hehe awesome man! I'm going to need to find some time to check the code and learn.
In return I did a small donation ;).
To be honest I haven't even had time to test the script yet, but I'm letting all my friends know ;)
Cheers,
Norman
thank you
thank you. I am amazed myself that I managed to find the time to script this. I carried the idea around for years already...
Arg. It's always the same, the instant I upload a script I discover a nasty bug...and a typo... will have to wait until tomorrow...
Well and for the opensource: It's my christmas present to the community :-). Photoshop macros nested in java script nested in maxscript and just a little bit of dotnet, too :-D
www.davidshelton.de/blog
Awesome!
This is great! You totally beat me to it! I wanted to make this exact thing but never managed to find the time. Congrats! :D
edit: woah! also un-encrypted! You are the man! :)