SnowFlow - make snow with the click of a button
This plugin is out of date. Please use the new SnowFlowPro instead!
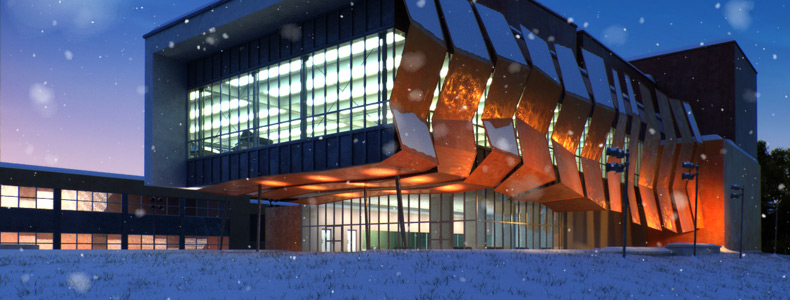
SnowFlow is a 3D Studio Max script/plugin that creates realistic snow with ease! You just pick an object and SnowFlow does the snow for you! Let the snow fall on your 3D objects and scenes with the click of a button.
features
- self-explaining user interface with integrated help
- one-click-solution in most standard situations
- multiple snow methods for different needs
- advanced settings to get the best out of SnowFlow
- different reality levels to control object interference
- preset system for a faster workflow
- full control over the calculated mesh
- network rendering with any network rendering solution
- system unit check and conversion to achieve full snow details
- autoTune options for better performance
- caching system to prevent unnecessary recalculations
- "SnowPlug" to stick objects into snow surfaces
- "SnowPrint" to make footprints and things like that
notes
You do NOT need VRay to use SnowFlow, but it can create a VRay snow material automatically. If you have problems installing SnowFlow, make sure you run the setup as administrator!
changelog
- SnowFlowPro released
-
[v1.8]
- SnowPrint feature added
- optimized "extrusion method"
- "shell method" added
- UI enhancements
- new activation system
-
[v1.7]
- new VRay material without transparency
- check for updates on startup (can be disabled)
-
[v1.6]
- all parameters are now saved when closing SnowFlow
- significant performance boost in selection phase (snowfall reality high)
- performance boost in snowflakes method
- optimized caching
- fixed a small "wind / rough surface" bug
- fixed a bug with particles, Creativity Extension not needed anymore!
(thanks to scanline vfx!) - search for update ("About" rollout)
-
[v1.5]
- added preset system
- added standard material
-
[v1.4]
- added material rollout
- procedural snow material (Standard, VRay or manual)
examples:

settings

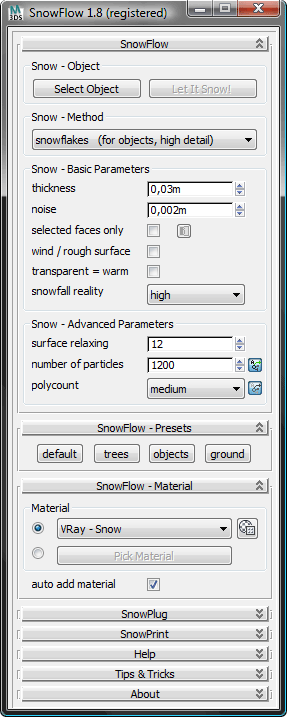
Thickness
This parameter controls the height of fallen snow. Please note that if noise is added, the final snow height can be a bit higher than the value set here. It’s also possible to add more thickness to the final snow mesh with a push modifier.

Noise
Noise controls the amount of turbolences of the snow surface. This makes the snow surface look more natural. You can also add a noise modifier on top of the final snow mesh to get the same effect or use bump/displacement in your material.

Selected faces only
Preselect regions where you want snow to fall on. You can also invert the selection. With this option activated, you must select faces to get a result. This option speeds up the selection process.

Wind / rough surface
This parameter lets more snow fall on vertical parts of an object, like it can be seen on the side of trees. You will get natural looking holes in your snow surface if thickness is small and you don’t adjust particle count.

Transparent = warm
Transparent materials “melt” the snow. Check this option for roof windows or car windows for example where you want to mimic the effect of a warm interior. Note that this can only be used with transparent materials, not textures.

Snowfall reality
Snowfall reality controls parts of the object to be not occluded at all (normal), be occluded by the object itself (high) or be occluded by all objects around the scene (real). Reality set to “real” pushes rendertimes up a lot!

Surface relaxing
Surface relaxing makes a “smoother” surface and makes it look less “blobby”. It has effect on the snow surface even if noise is on. It fills holes in the snow as well. With our “extrusion” method you should keep this parameter relatively low.

Number of particles
This parameter controls the density of the snow surface. You should leave this “autoTuned” most of the time. The “Status & Progress” window will show you the calculated particle count which can be used to finetune this setting.

Polycount
This controls the number of polygons created by SnowFlow. Possible selections are:
extremely high, very high, high, medium, low, very low, extremely low. You should start at medium or high and go up or down as you need it.
You might also want to download our SnowFlow Quick Guide PDF that includes detailed explenations as well as Tips & Tricks for workflow optimisation.
| Attachment | Size |
|---|---|
| SnowFlow_teapots_testscene_3DSMax2010_VRay.max | 544 KB |
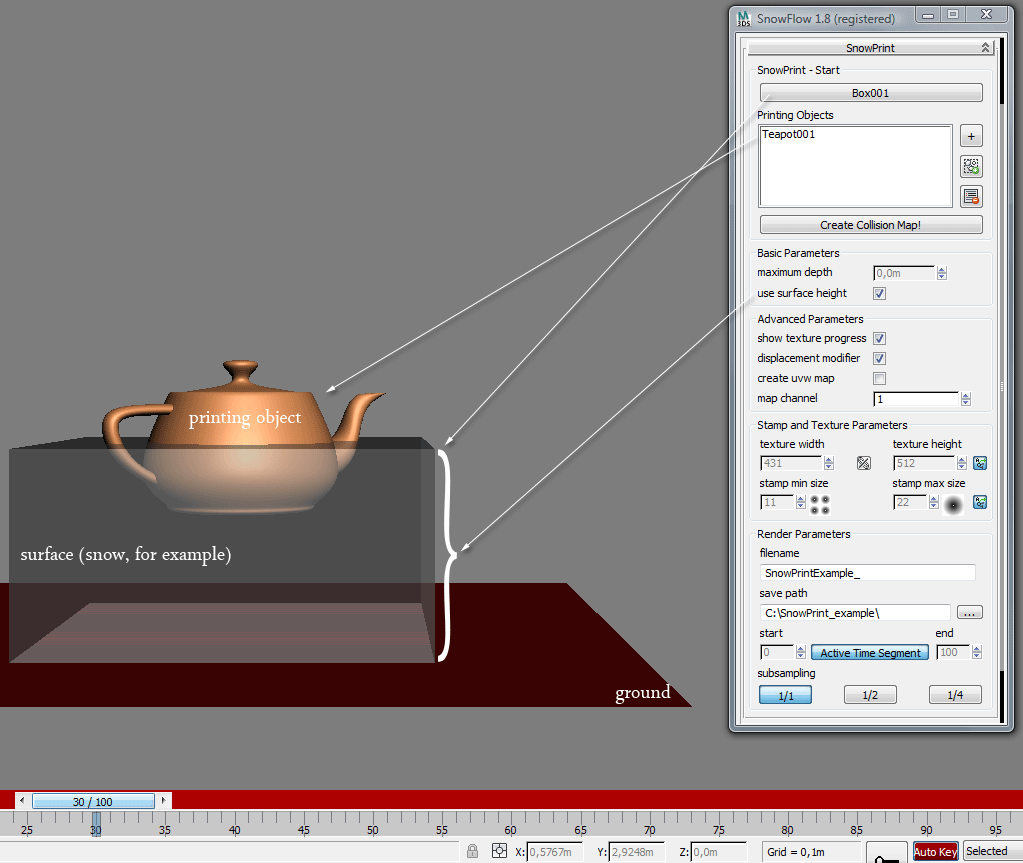
| SnowPrint_explanation.png | 41.06 KB |
Comments
SnowFlow
I bought both plugins – the snow plugin and the one for creating tracks – but they stopped supporting newer versions of 3ds Max. Alright, I thought, I’ll just install the older 3ds Max 2020. But when I request a license, I don’t receive any emails with the key. Did I just waste my money for nothing?
SnowFlowPro and SnowPrint
Please use the support form on www.zwischendrin.com for quick answering times.
SnowPrint inside the "old" SnowFlow (1.8) is a MaxScript. After programming SnowFlowPro in C++ (www.zwischendrin.com/goto/detail/261) we decided to split SnowFlow and SnowPrint. You can take a look at SnowPrint (also made in C++ now) here: www.zwischendrin.com/goto/detail/233
Best regards
Fabian
www.zwischendrin.com
The collision map detection
The collision map detection system you have going on? Is that c++ stuff or is that some sorta trick inside of max your executing?
John Martini
Digital Artist
http://www.JokerMartini.com (new site)
SnowFlowPro – OUT NOW!
Besides adding new features and improving the look and usability of our site, we have spent the last months developing a completely new version of SnowFlow, featuring exceedingly decreased calculation times and improved quality of the generated snow. Depending on the complexity of the scene, the generation process can be around 100 times faster (and nope – that's not a typo...). Scenes that would not have been possible to snow up within reasonable time even on high-end systems will now be literally ready within minutes. Like many of you requested, there is now a demo version available, so you can try out SnowFlow before buying it. For the first two months, there will be a special upgrade offer: If you already own one or more SnowFlow 1.8 licences, you can upgrade to SnowFlowPro for €65 only! And if you purchased your previous version after December 01, 2011 (GMT+01:00), you can even get it for the fabulous price of €48 only! Learn all about the exciting new features and get the demo!
www.zwischendrin.com
SnowPrint 2.0
SnowPrint is now a standalone plugin for 3D Studio Max to print objects onto other objects to create imprints, footprints, pencil strokes, wetmaps,...
Grab it on http://www.zwischendrin.com/goto/detail/233
www.zwischendrin.com
How to get SnowFlow for free:
For all of you that want to have SnowFlow 1.8 for free we do now offer a solution: ask us by email which language we need to have zwischendrin.com translated into and translate our website to get a free copy of SnowFlow! More in our blog: http://www.zwischendrin.com/blog/
www.zwischendrin.com
Please use our support form
Please use our support form provided on zwischendrin.com to get support for SnowFlow.
Thank You!
www.zwischendrin.com
nice
this is a beautiful tool, i like it,so i want to know how to make it ,,,thankyou!
its Amazing script!!
its Amazing script!!, I make a test here, really speed up my work flow.
cheers
kurson
http://www.youtube.com/user/kursondax?feature=mhum#p/u/0/oMqkF9XvUjA
please take a look in HD
http://www.vimeo.com/28402939
SnowPrint explanation
Hi! I attached a super fast SnowPrint tutorial. (SnowPrint_explanation.png) This should explain the main parameters even if I think everything should be self explaining... ;o)
SnowPrint will go through the animation range and create a bitmap for each frame with a collision map (greyscale image, watch SnowPrint teaser 02). It automatically adds a displacement modifier on top of the surface modifier stack if you enabled this checkbox.
If you have problems read the post here: http://www.zwischendrin.com/blog/
www.zwischendrin.com