Drag & Drop Reference Images
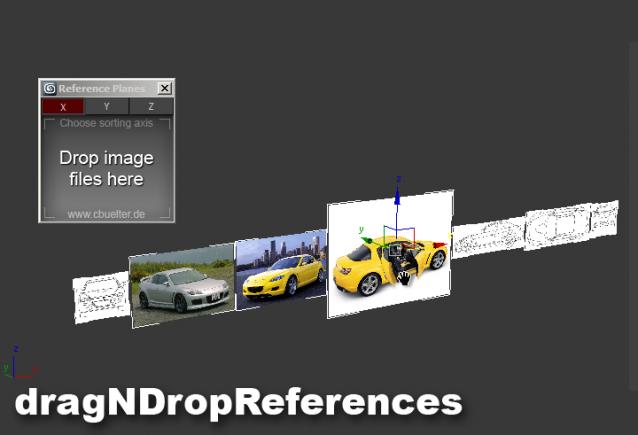
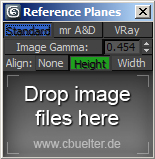
For modeling in 3ds Max I like to use image planes textured with reference images of my object. Not only for blueprints, but even any reference, because on my laptop screen space is very limited and this way I don't have to switch between applications, just move my view a little. Setting up those planes is annoying, because you would have to create a material for each and then a plane with the right aspect ratio. This script automates all this, by giving you a little window where you can drag and drop any common image type onto. The reference planes will then be created on a line and you can specifiy whether to align height/width of all images. You can also choose a material type and the gamma value that the images are loaded with.
22/08/13: Added scaling option for planes; Script now remembers its settings
03/01/13: Set plane segments to 1 on creation
05/12/12: Removed axis checkboxes, added option to align width or length of the planes, updated image, tightened UI
18/11/12: Removed self-illumination from Standard material. which made things too bright (thanks to DeaDog)
13/10/12: Added option to choose the material type (mr arch&design, standard & vraymtl)
06/10/12: Disabled Real World Scale for maps, added Gamma correction option using a color correction map (thanks to miauu, Kinofaya)
29/09/2012: UI checkbutton fix, thanks to Anubis
27/09/2012: Now recreates image from Base64 string (method by LoneRobot.net, thanks to barigazy); now uses "maxOps.canImportBitmap" thanks to Anubis
Explanatory video:
Comments
Thanks
Your script is very useful :)
I've encountered a problem, i put the solution here if others have the same issue : windows wan't allow me to drag & drop a file on 3dsmax ! Solution : don't run 3dsmax in admin mode :)
Thanks
Looks like it's missing "FACE MAP' checked option, that's the only thing makes this a one step operation. nice work, thank you.
-Sincerely, DrStein99
Thanks for sharing your
Thanks for sharing your article was great and its useful.
purchase targeted twitter followers
Sorry, I missed the email
Sorry, I missed the email response on this, many thanks, also I hadn't noticed the plane segments to 1 before, pedantic I know, but anything to save mouse clicks ;)
Hey glad to hear, you can now
Hey glad to hear, you can now scale it (1.0 = 100%, which is 1 px = 1 world unit) and the script will remember all settings so you dont have to change them each time, cheers!
Never get low & slow & out of ideas
Hi ,I use this script
Hi ,I use this script everyday to pull reference and 2d plane textures into Max, Is it possible to have a scale setting ?
When working at small scale and I pull in an image the created plane is huge and I always have to resize it. It would be useful to have it come in at a predefined size percentage.
thx
haha you were a little too
haha you were a little too fast :D I took it out completely and uploaded the new version, thanks for pointing that out
Never get low & slow & out of ideas
Question
Awesome script! In my case the images were too bright so I overrided the Self-Illumination value to 0 and solved the problem =).
thanks Ian, yes you can :)
thanks Ian, yes you can :) you can now choose the material type, so much for my plan to keep the UI simple haha
Never get low & slow & out of ideas
this script is super
this script is super useful!
any chance we can get a version that makes a v-ray material with the bitmap instead of standard?
// www.v-motion.co //